Pixie Cut – 13 Styles That Make the Chop Worth It
The pixie cut has the best PR of any haircut on earth. One photo of a gamine crop and suddenly you believe mornings will be effortless — wake up, shake, leave. Then reality arrives: on fine hair the wrong pixie collapses flat by mid-morning, on thick hair it balloons into a triangle by noon, and a fringe cut against a stubborn cowlick fights you daily. A pixie cut is not low-maintenance by default; it becomes low-maintenance only when the variant matches your hair texture and face shape.
That is exactly what this guide fixes. There is not one pixie cut — there are engineered variants for every texture and face shape, from deep side parts that slim round faces to tapered napes that de-bulk thick hair. A pixie cut chosen this way genuinely becomes the five-minute hair it promises to be. Below are 13 styles worth booking, each with honest notes on who it flatters — and who should skip it.
Table of Contents
- Pixie Cut Styles Worth Booking
- 1. Classic Sleek Pixie With Deep Side Part
- 2. Layered Pixie With Long Bangs
- 3. Choppy Textured Pixie
- 4. Asymmetrical Pixie
- 5. Wavy Pixie With Layered Bangs
- 6. Long Pixie (Pixie Bob)
- 7. Tapered Pixie With Elongated Fringe
- 8. Shaggy Pixie
- 9. Undercut Pixie
- 10. Pixie With Side-Swept Bangs
- 11. Feathered Fringe Pixie
- 12. Pixie With Buzzed Sides
- 13. Silver Gray Pixie
- How to Choose the Right Pixie Cut
- How to Style a Pixie Every Morning
- Growing Out a Pixie Without the Awkward Stage
- FAQs
- Which face shapes suit a pixie cut?
- How often does a pixie cut need trimming?
- Can you get a pixie cut with curly hair?
- Does a pixie cut make you look older or younger?
- How long does it take to grow out a pixie cut?
- What products do I actually need for a pixie cut?
- Can I style a pixie cut without heat tools?
- Will a pixie cut work on fine, thin hair?
Pixie Cut Styles Worth Booking
1. Classic Sleek Pixie With Deep Side Part
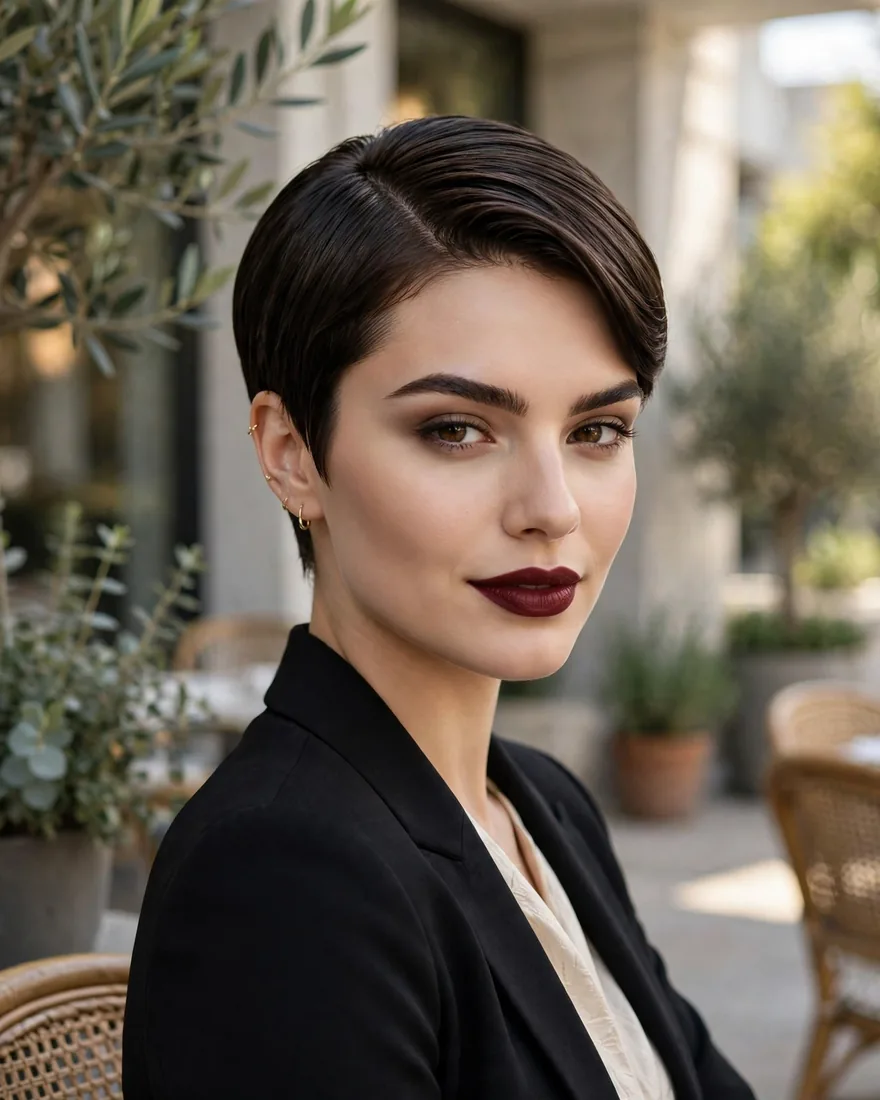
The timeless icon of the pixie cut world — short through the back and sides, longer on top, swept into a deep side part that creates instant asymmetry and lift. It is the most polished of the thirteen — the part gives the style a clear direction, which is why it photographs so well.
Benefits:
- The deep part creates the illusion of volume at the crown, a lifesaver for fine hair
- Asymmetry slims and lengthens round and square faces
- Grows out more gracefully than blunt micro-pixies
Pro Tip: Ask your stylist to place the part on wet hair — a dry-cut part can shift as it settles, and a pixie has no length to hide the mistake.
How To Style: Blow-dry the top forward and to the side with a small round brush, then smooth a pea-sized amount of pomade along the part line for clean definition.
Best For: Oval, round, and square faces; fine to medium straight hair.
2. Layered Pixie With Long Bangs
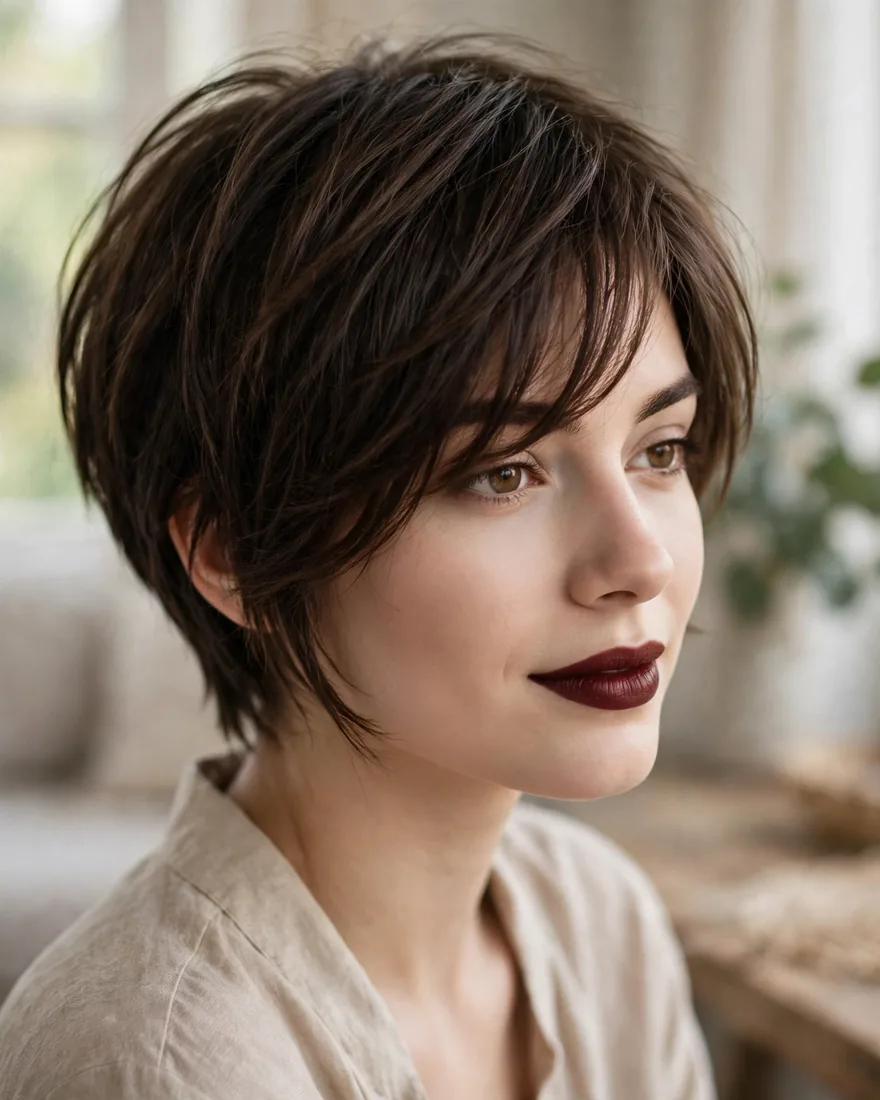
Short, stacked layers through the crown with the bangs left long enough to sweep, tuck, or pin — the most versatile pixie on this list. The extra length on top gives you styling options the shorter variants simply do not: side-swept today, textured and pushed forward tomorrow.
Benefits:
- Long bangs double as a grow-out safety net when you start growing the cut out
- Layers remove weight, so thick hair lies flatter without aggressive thinning
- Can be styled soft and feminine or piecey and bold depending on the day
Pro Tip: Keep bangs at cheekbone length or longer — shorter bangs limit styling options and grow out awkwardly.
How To Style: Rough-dry with your fingers for natural texture, then flick the bangs into place with a flat iron; finish with a light texturizing spray.
Best For: Thick or coarse hair; heart and oval faces.
3. Choppy Textured Pixie
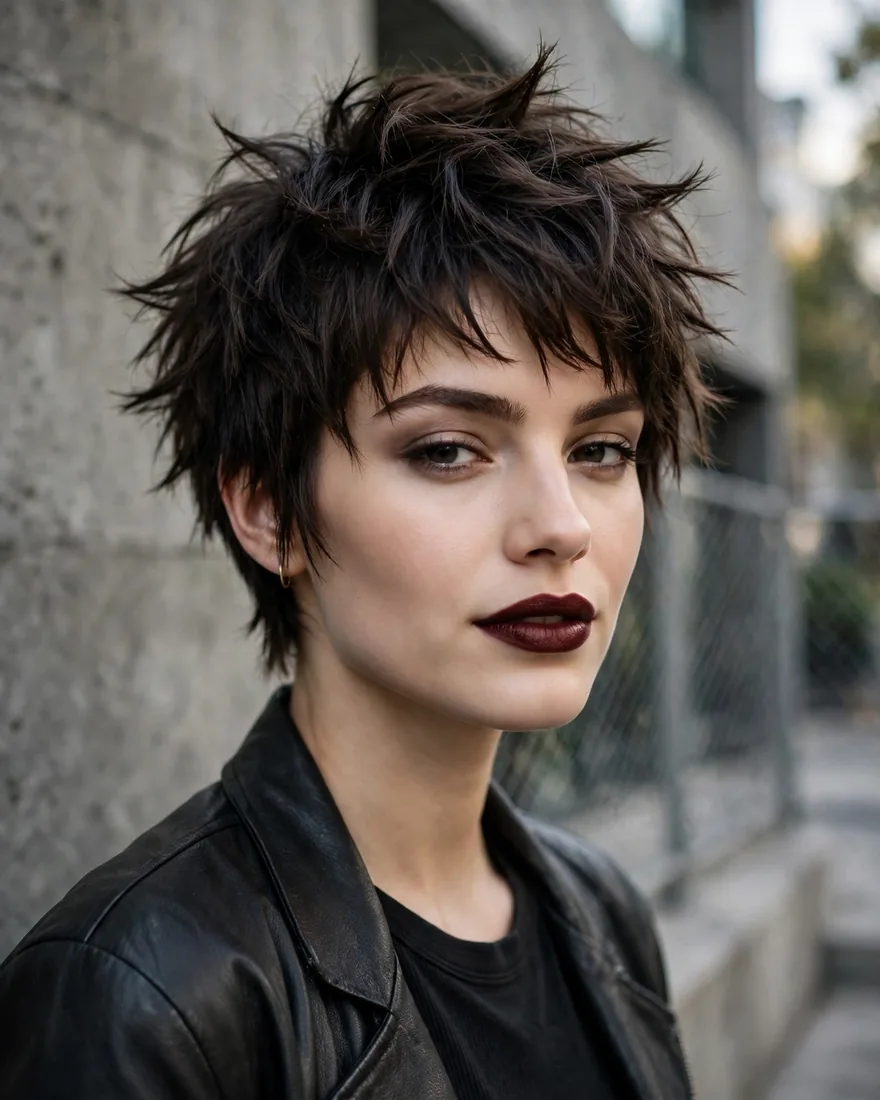
Point-cut ends, disconnected layers, and deliberate piece-iness — this is the pixie for people who want edge without committing to an undercut. The choppiness creates movement that makes even fine hair look like it has twice the density.
Benefits:
- Texture disguises thinning spots and makes fine hair look fuller
- Air-dries genuinely well — one of the few pixies suited to wash-and-go
- Hides cowlicks by working with the hair’s natural growth direction
Pro Tip: This cut lives or dies by the finishing product. Without wax or paste, choppy layers read as unfinished rather than intentional — the product is not optional here.
How To Style: Work a small amount of matte clay through dry hair, pinching the ends into points with your fingertips. No brush required.
Best For: Fine to medium hair that needs the illusion of density; oval and heart faces.
4. Asymmetrical Pixie
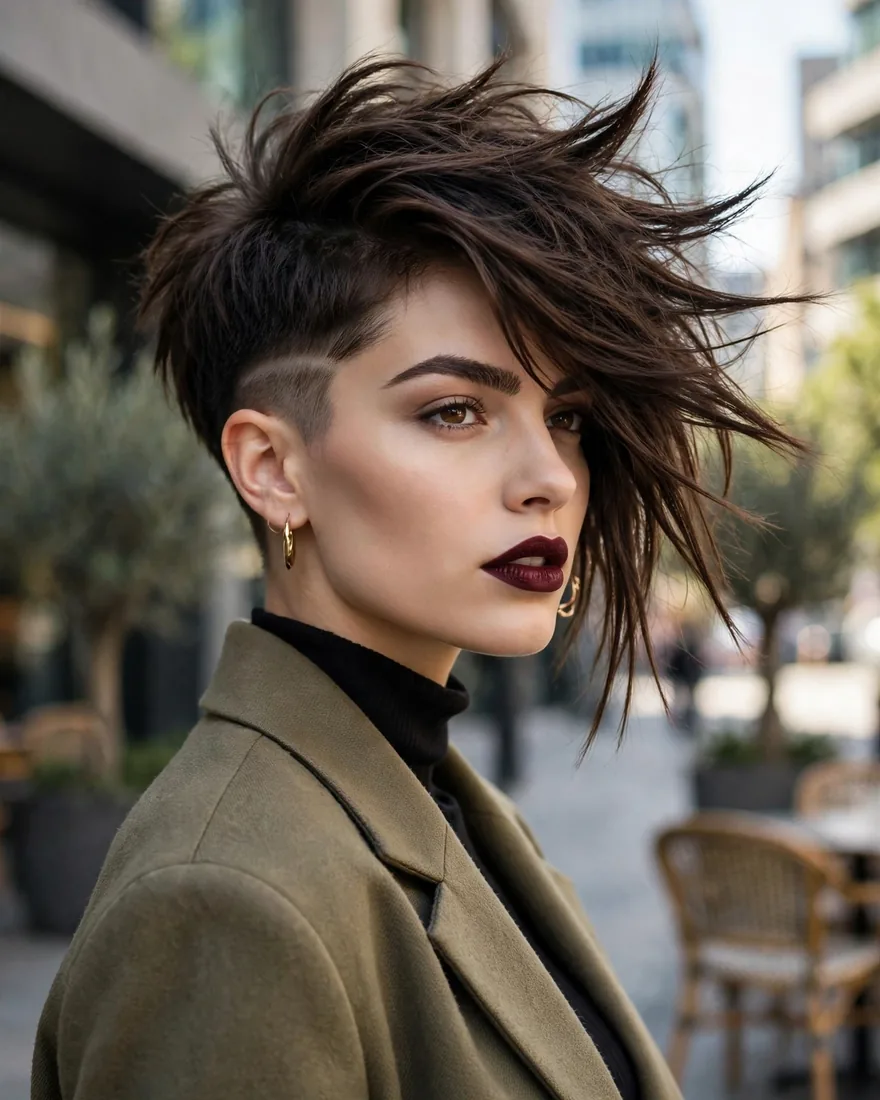
One side cropped close, the other left dramatically longer — sometimes grazing the cheekbone or jawline. The asymmetry does genuine contouring work, drawing the eye diagonally instead of letting it rest on width.
Benefits:
- The diagonal line visually slims wide cheeks and strong jawlines
- The long side can be tucked, pinned, or even loosely braided for variety
- Makes a strong style statement with minimal daily effort
Pro Tip: The long side needs at least three inches to tuck behind the ear, or it flips outward and ruins the line.
How To Style: Flat-iron the long side smooth and tuck it behind the ear for daytime; add a deep wave with a curling wand for evening.
Best For: Round and square faces; straight or slightly wavy hair.
5. Wavy Pixie With Layered Bangs
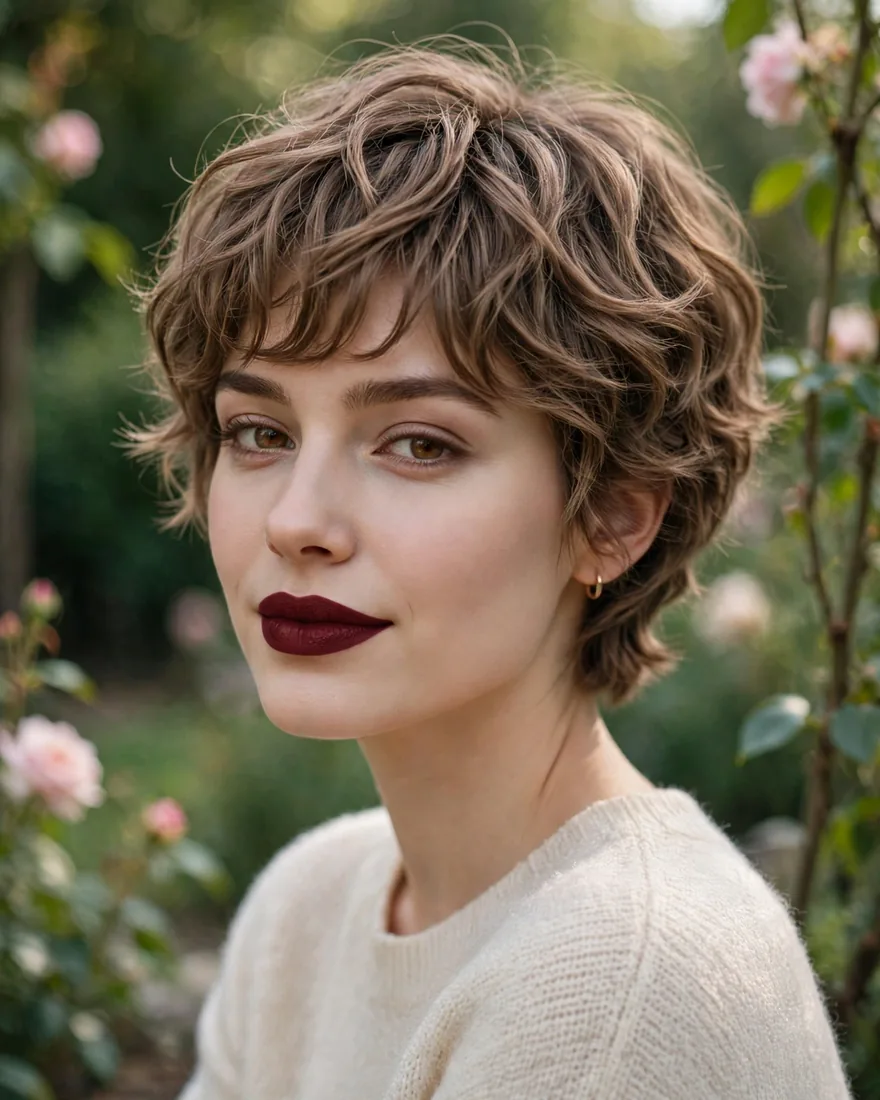
A pixie that lets natural wave do the talking — the layers are cut to enhance the wave pattern rather than suppress it, with the bangs layered to fall in soft, broken pieces. It is romantic where most pixies are severe. If your texture leans curly, a dedicated curly pixie cut approach with dry-cutting will serve you even better, and our guide to short curly hairstyles covers the styling products that keep waves defined at this length.
Benefits:
- Works with natural texture instead of requiring daily heat styling
- Layered bangs soften foreheads and strong brow lines
- Natural wave gives fine hair believable, touchable volume
Pro Tip: If your waves are unpredictable, ask for the cut on dry, naturally-styled hair. Cutting wavy hair wet can remove too much length once it springs up dry.
How To Style: Scrunch curl cream into damp hair and diffuse or air-dry; refresh day-two waves with a water mist and a dab of cream.
Best For: Naturally wavy hair; oval and long faces.
6. Long Pixie (Pixie Bob)
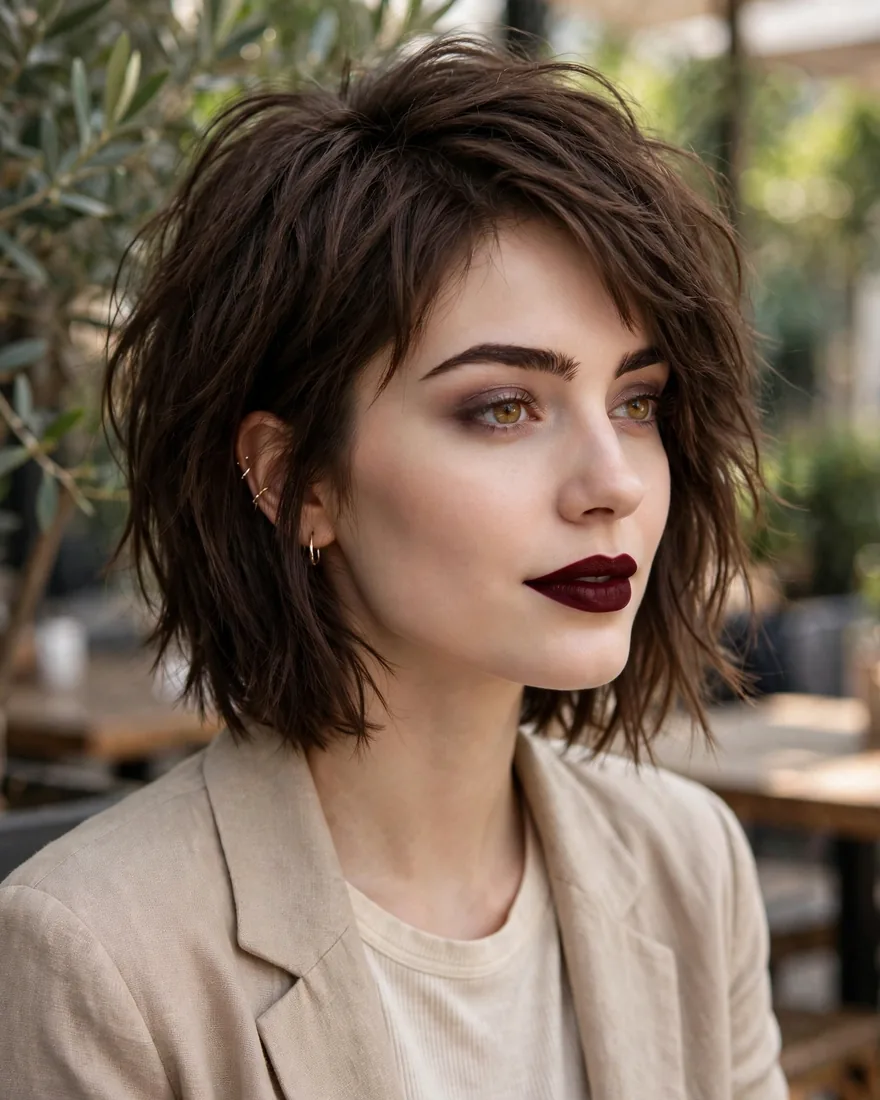
The bridge between a pixie and a bob — the nape and sides stay pixie-short, but the top and front carry bob-like length, often reaching the jawline. It is the least intimidating entry point into the pixie world and by far the easiest to grow out. For the full spectrum of this in-between length, see our long pixie bob ideas.
Benefits:
- The most styling versatility of any pixie — longer versions can even pull into a tiny ponytail
- Flatters the widest range of face shapes
- The gentlest grow-out path of any short cut
Pro Tip: The line between “long pixie” and “short bob” is the nape — if the back is not tapered or cropped, you have a bob.
How To Style: Blow out smooth for polish, or add bends with a flat iron for a modern, lived-in finish.
Best For: First-time pixie cutters; thick hair; all face shapes.
7. Tapered Pixie With Elongated Fringe
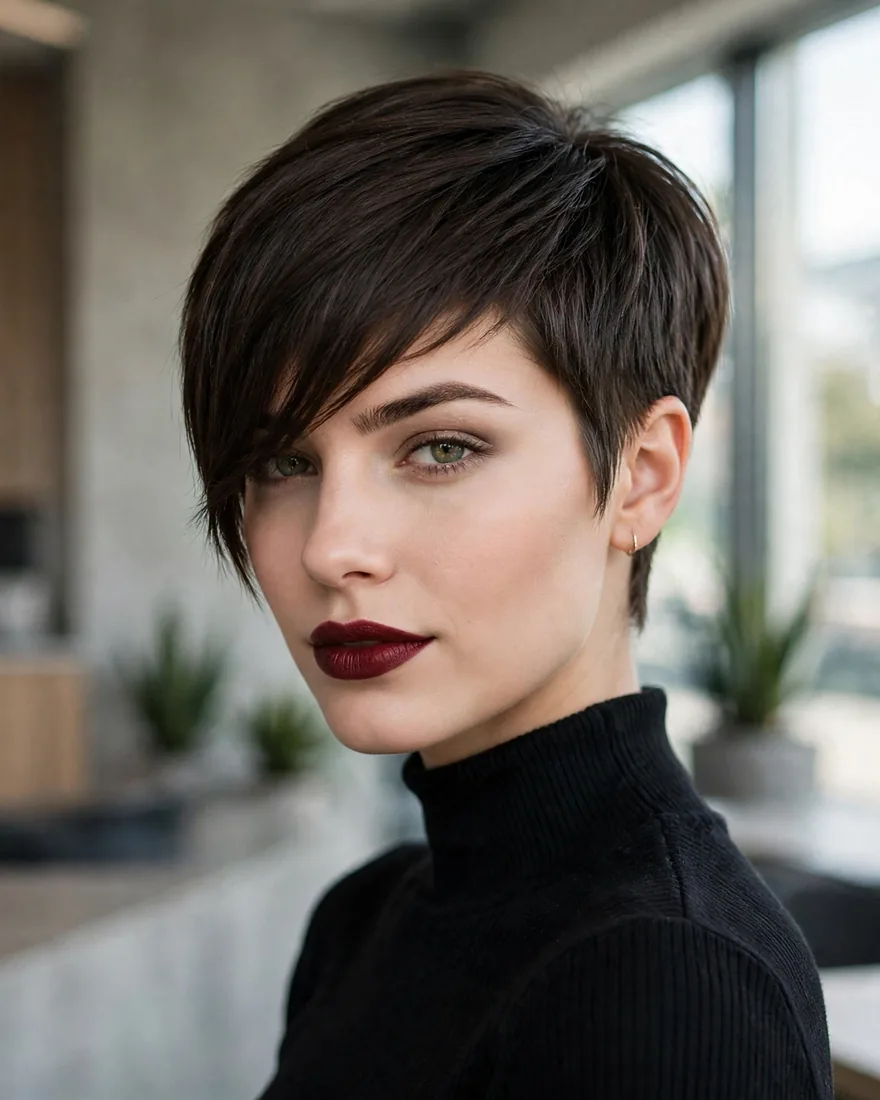
Precision-tapered sides and nape that hug the head, contrasted with a long, sweeping fringe up front — architectural in the back, soft in the front. This is the pixie that looks expensive, because clean tapering requires genuine clipper skill and it shows.
Benefits:
- Tapering removes bulk exactly where thick hair misbehaves most — the nape and behind the ears
- The elongated fringe balances long faces and high foreheads
- The clean neckline stays sharp for three to four weeks between trims
Pro Tip: Find a stylist genuinely good with clippers — a bad taper grows into a visible shelf you will see every day.
How To Style: Sweep the fringe across the forehead with a blow dryer and round brush; keep the tapered sides neat with a dab of pomade.
Best For: Thick, coarse hair; long and oval faces.
8. Shaggy Pixie
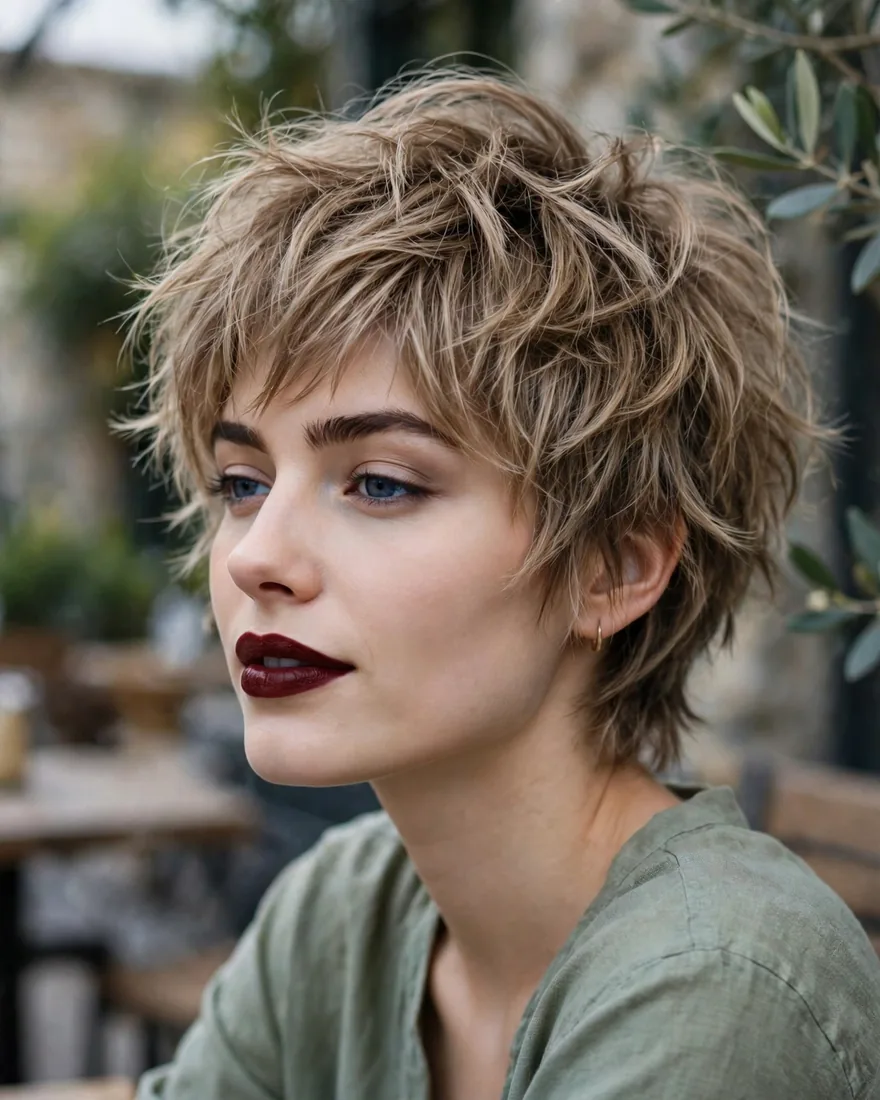
The rock-and-roll pixie — razored layers, wispy ends, and a fringe that falls wherever it wants. It is the least “done” looking pixie here, which is exactly the point: the mess is the style, and it only gets better as the day goes on.
Benefits:
- The ultimate low-effort pixie; bedhead is the intended finish
- Wispy layers add movement to straight, limp hair
- Razored ends remove weight without the see-through look of thinning shears
Pro Tip: Shaggy does not mean shapeless — the outline still needs precision cutting, or it grows mullet-adjacent within a month.
How To Style: Air-dry with sea salt spray scrunched in, then piece out the ends with a tiny amount of wax.
Best For: Straight to wavy medium hair; oval, heart, and square faces.
9. Undercut Pixie
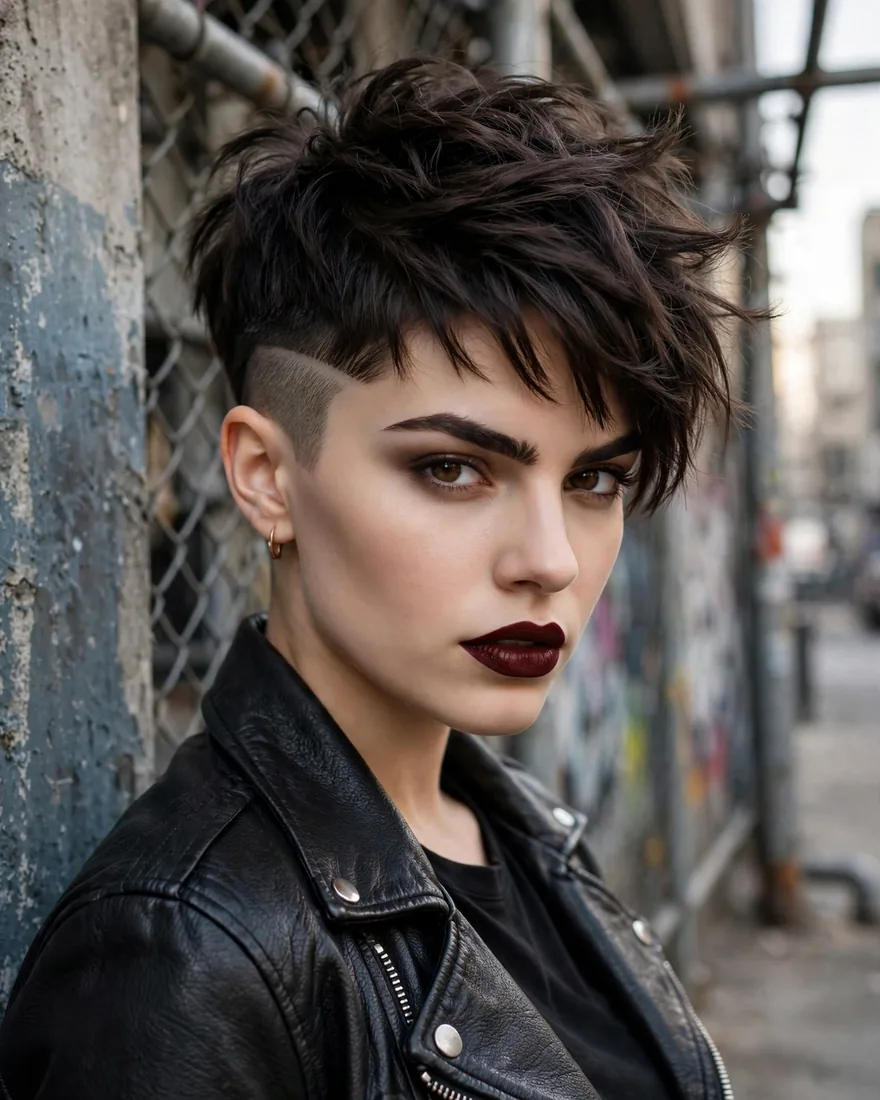
A pixie on top with the sides, the nape, or both buzzed or faded underneath — maximum contrast, minimum bulk. The undercut removes up to half the hair’s volume in a single move, which is why thick-haired pixie wearers swear by it. If the buzzed element appeals to you, our buzz cut guide breaks down guard lengths and grow-out realities.
Benefits:
- Dramatically reduces styling time for very thick hair
- Keeps you noticeably cooler in summer
- A hidden nape-only undercut offers edge without the visible commitment
Pro Tip: Start with a nape-only undercut if you are nervous. It is invisible when your hair is down and grows out without any awkward phase.
How To Style: Style the top as usual; keep the undercut crisp by getting it edged every two to three weeks — many barbershops do quick cleanups inexpensively.
Best For: Very thick or coarse hair; anyone wanting bold contrast; oval and heart faces.
10. Pixie With Side-Swept Bangs
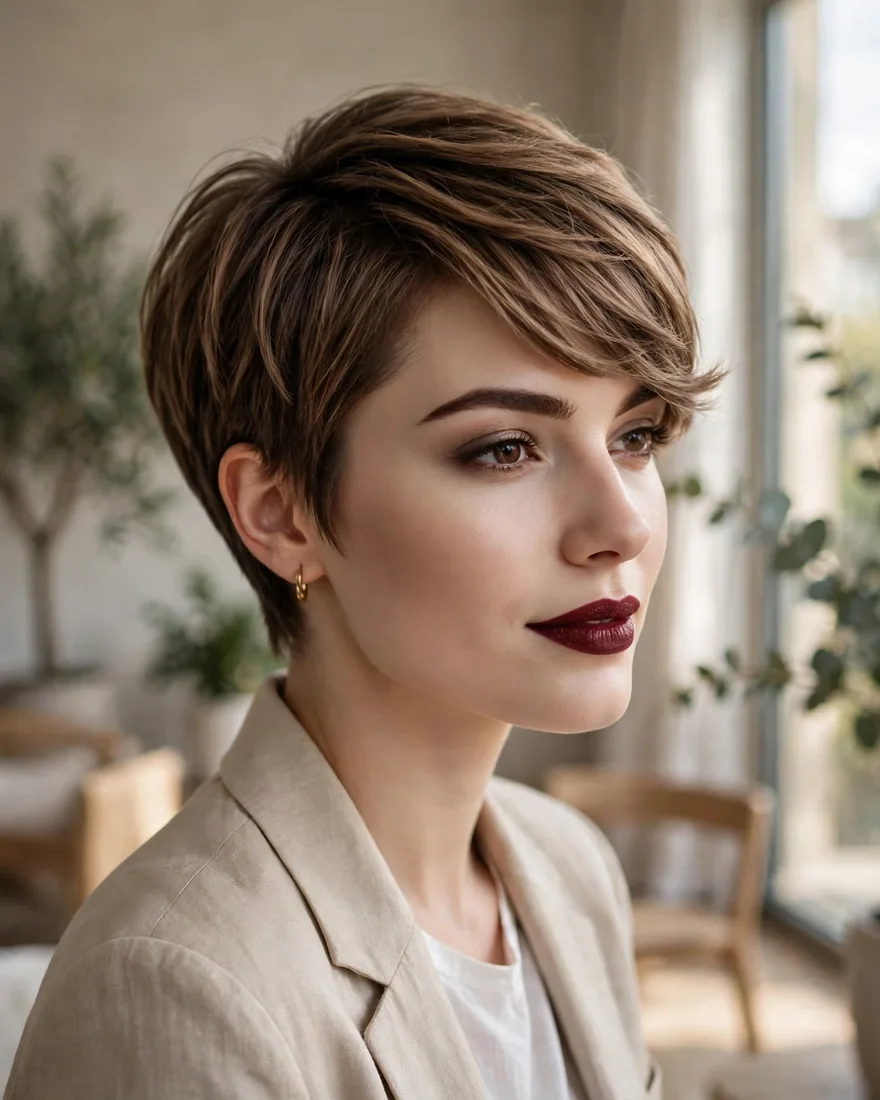
The diplomat of pixie cuts — a classic short crop with bangs swept dramatically to one side, softening everything they touch. Side-swept bangs are face-shape magic: they break up a wide forehead and add diagonal interest to round faces. For more on fringe placement, browse our types of bangs guide.
Benefits:
- The most universally flattering fringe placement in the pixie family
- Softens strong features without hiding the face
- Easy to restyle — the bangs can be pinned back, center-parted, or swept
Pro Tip: Side-swept bangs must be cut on the diagonal they will be worn — bangs cut straight across then swept aside never sit right.
How To Style: Blow-dry the bangs across the forehead with a paddle brush, directing them to the side; set with a light-hold spray.
Best For: Round, square, and heart faces; fine to medium hair.
11. Feathered Fringe Pixie
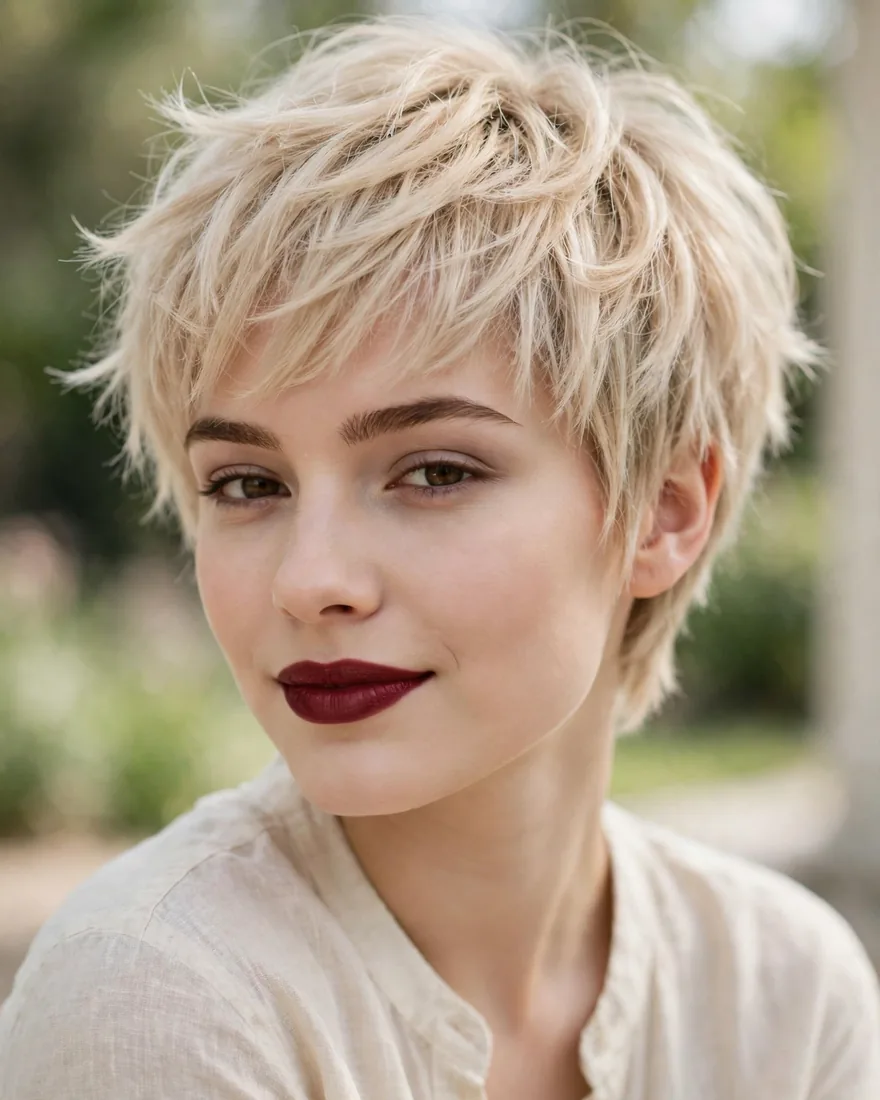
Light, airy, feather-cut bangs over a soft pixie base — the classic 70s feathering technique applied to a modern crop. The fringe is the star: wispy, textured, deliberately imperfect — softer and more youthful than any blunt fringe.
Benefits:
- Feathering makes thick bangs lie lighter and move naturally
- Softens fine lines around the eyes and forehead
- Reads younger and more approachable than blunt-fringe pixies
Pro Tip: Feathered bangs need point-cutting, not thinning shears — shears can leave ends reading damaged rather than feathered.
How To Style: Blow-dry the fringe forward with your fingers — not a brush — for natural separation; a drop of serum tames flyaways without adding weight.
Best For: Mature hair and faces; fine to medium textures; oval and long faces.
12. Pixie With Buzzed Sides
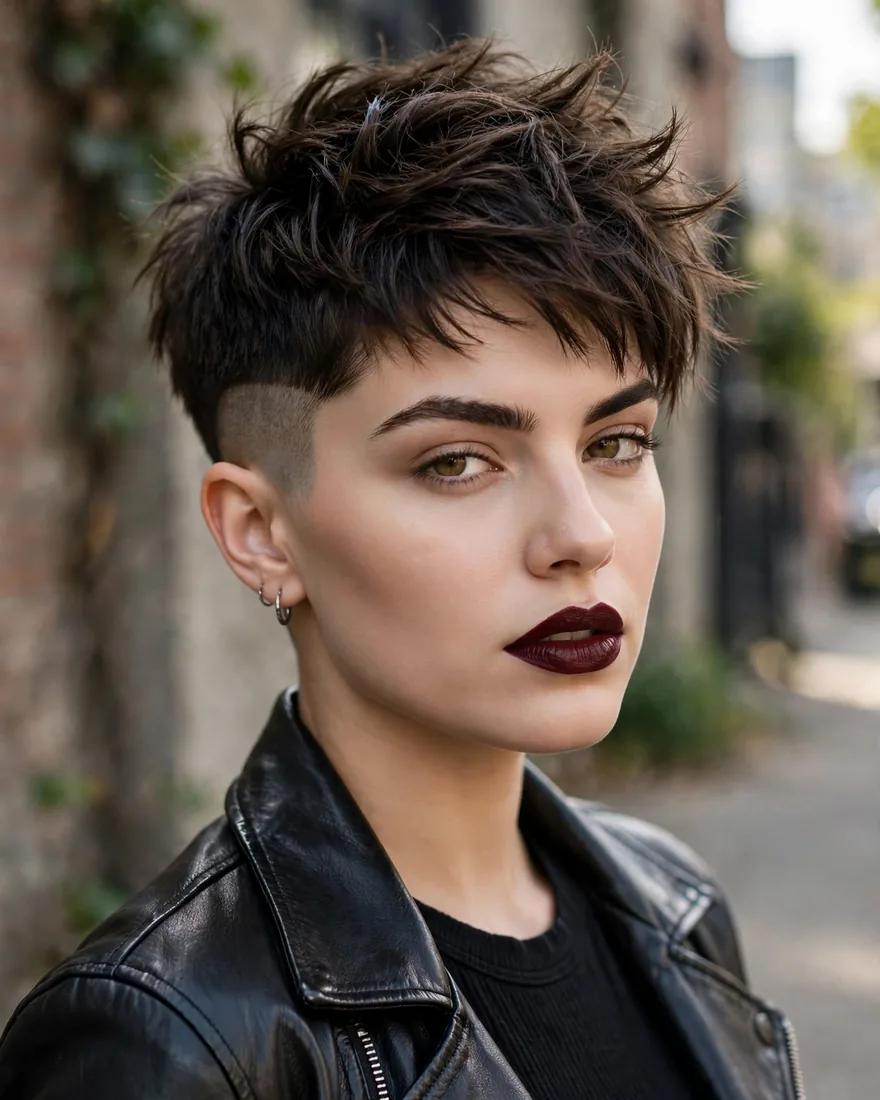
Tight faded or buzzed sides with length kept on top — the pixie’s boldest silhouette, borrowed from men’s barbering. The contrast between the soft top and severe sides puts all the attention on your bone structure. See also our roundup of short cropped hairstyles for more close-cut inspiration.
Benefits:
- The fade keeps the sides perfect for weeks — only the top needs daily styling
- Visually elongates the neck and showcases earrings and jawline
- Among the most practical pixie variants: the shortest sides of any style here
Pro Tip: Bring reference photos of the exact fade level — “short on the sides” means different things to different stylists.
How To Style: Add volume to the top with a blow dryer and root-lifting spray; the sides need nothing at all.
Best For: Oval and heart faces; straight or wavy hair; anyone ready for a statement cut.
13. Silver Gray Pixie
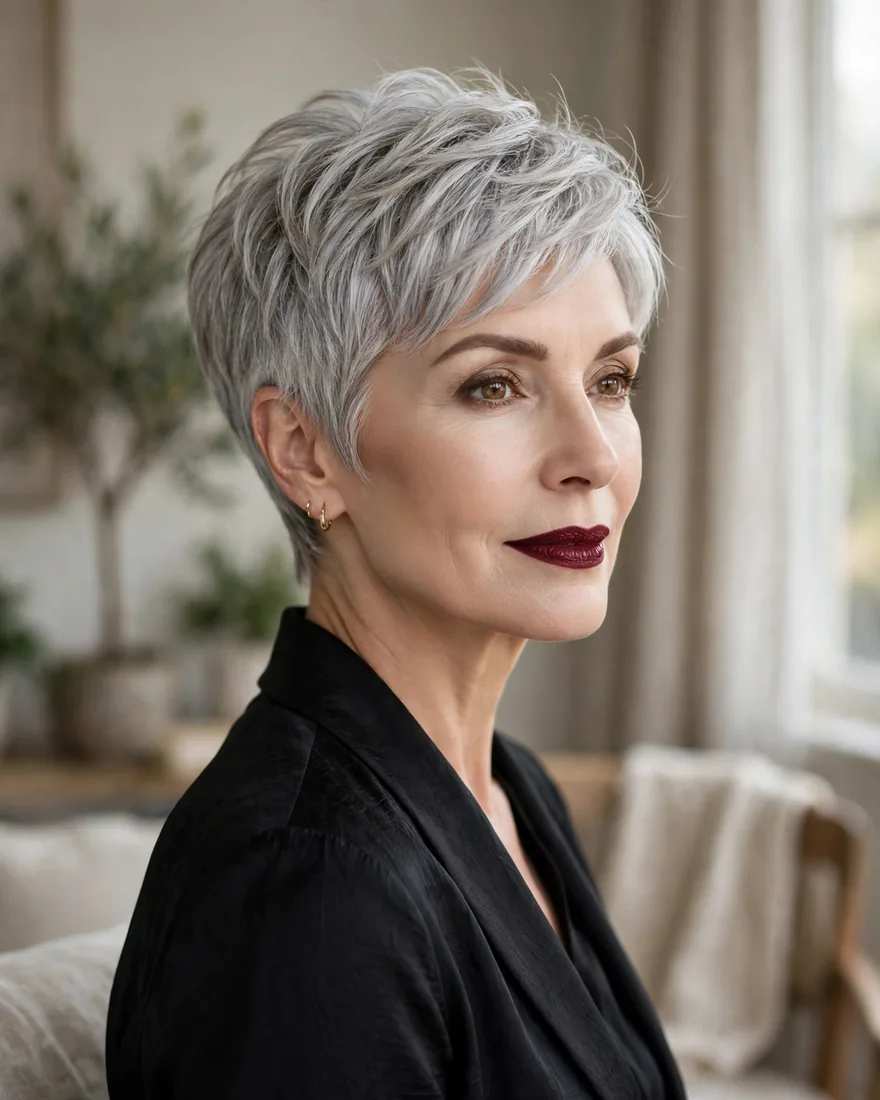
A pixie worn in natural or enhanced silver, gray, or white — and there is no better haircut for going gray gracefully. Less old dyed length to grow out, and the crop makes silver look intentional and chic rather than neglected.
Benefits:
- The fastest, most flattering route to embracing natural gray
- Silver tones reflect light, making fine hair look visibly denser
- A pixie grows out dyed color faster than any long cut — months, not years
Pro Tip: Use purple shampoo weekly to stay bright — without it, gray turns yellow and dull, especially in hard water.
How To Style: Style as usual, but finish with a shine serum. Gray hair can look dry even when it is perfectly healthy, and shine is what sells the look.
Best For: Women embracing natural gray; fine hair that needs light reflection; all face shapes.
How the 13 styles compare at a glance:
| Style | Best Hair Type | Daily Effort |
|---|---|---|
| Classic Sleek Pixie With Deep Side Part | Fine to medium straight | Medium — blow-dry + pomade |
| Layered Pixie With Long Bangs | Thick or coarse | Low to medium |
| Choppy Textured Pixie | Fine to medium | Very low — clay and go |
| Asymmetrical Pixie | Straight to slightly wavy | Medium — long side needs smoothing |
| Wavy Pixie With Layered Bangs | Naturally wavy | Low — cream and air-dry |
| Long Pixie (Pixie Bob) | All, esp. thick | Medium — most styling options |
| Tapered Pixie With Elongated Fringe | Thick, coarse | Medium — fringe needs direction |
| Shaggy Pixie | Straight to wavy medium | Very low — salt spray and go |
| Undercut Pixie | Very thick or coarse | Low — top only, plus upkeep trims |
| Pixie With Side-Swept Bangs | Fine to medium | Medium — bangs need blow-drying |
| Feathered Fringe Pixie | Fine to medium | Low to medium |
| Pixie With Buzzed Sides | Straight to wavy | Low — volume on top only |
| Silver Gray Pixie | Fine (light-reflective) | Low — plus weekly purple shampoo |
How to Choose the Right Pixie Cut
Start with your hair texture, not your face shape — texture decides which pixie will cooperate. Fine hair needs a pixie built for lift: deep side parts, choppy texture, and crown layers that create the illusion of density, because fine hair goes flat without architectural help. Thick hair needs the opposite engineering: tapering, undercuts, and weight-removing layers that stop the cut from ballooning outward. If a past pixie turned into a triangle, blame missing taper work at the nape — not the length on top.
For mature or thinning hair, the pixie is genuinely one of the smartest choices you can make — short hair makes thinning far less visible than long hair does, and the right variant adds back what time takes away. Choppy texture and feathered fringes disguise sparse areas; sleek one-length crops expose every thin spot. If you are going gray, lean into it: silver and white tones reflect light and make fine hair look denser, and a pixie grows out old dye faster than any other cut. For more close-crop options suited to thinning hair, see our very short hairstyles guide.
Face shape is the second filter. Round faces need height on top and asymmetry — deep side parts, asymmetrical lines, anything that breaks the circle. Square faces need softness around the jawline: side-swept bangs, feathered fringes, wispy ends. Long faces need width and fringe coverage: elongated fringes, wavy volume at the sides. Oval faces suit nearly everything. When in doubt, bring three reference photos of pixies you love and one of a pixie you hate; the “hate” photo tells your stylist as much as the loves do.
How to Style a Pixie Every Morning
Most pixies take five to ten minutes once you know your product map. Here is the honest breakdown: wax gives piece-y separation and medium hold — best for choppy and shaggy pixies. Pomade gives shine and sleek control — best for classic side-part and tapered styles. Clay and paste give matte texture with strong hold — best for adding grit to fine hair and defining buzzed-side tops. Mousse and root-lifting spray go in before blow-drying when you need volume that lasts past noon. One product used correctly beats a shelf of half-used jars — if you buy one thing, make it matte clay. Our short hair styling guide covers tools and techniques for every short length.
Blow-dry versus air-dry is a texture decision, not a preference. Fine, straight pixies almost always need a blow dryer — two minutes with a small round brush at the crown is the difference between flat and full, and no product fully replaces that lift. Wavy and shaggy pixies are the air-dry champions: cream or salt spray scrunched into damp hair, then hands off. The cardinal rule: decide where the hair is going before you start — short hair has a memory, and the first two minutes set the style for the day.
Now the upkeep nobody warns you about: a pixie needs trimming every four to six weeks to keep its shape, and the edgier the cut, the faster it loses its edge — undercuts and fades need attention every two to three weeks. Budget honestly: pixie maintenance typically costs more per year in salon visits than long hair, though daily styling is faster. The trade is real — minutes saved every morning, paid for in salon visits. Go in with open eyes and you will never resent it.
Growing Out a Pixie Without the Awkward Stage
Let us be honest about the timeline first: growing a pixie cut to a chin-length bob takes roughly eight to twelve months, because hair grows about half an inch per month and you are starting from one to three inches. No product changes that math — only shaping that makes the in-between months look intentional. The grow-out fails when people simply stop cutting; it succeeds when you keep getting trims every eight to ten weeks, reshaping the cut as the proportions change.
The strategy is to grow through deliberate bridge cuts rather than enduring an amorphous in-between. First stop: the bixie, a pixie-bob hybrid where the top and front gain length while the nape stays neat — it looks like a style choice, not a grow-out. Second stop: the shaggy bob, where layers blend the uneven lengths into something fashionable. Throughout, keep the neckline and the hair around the ears trimmed; a clean perimeter is what separates “growing out” from “grown out of control.” Headbands, clips, and deep side parts are your allies in months three to six, when the top flops but will not tuck.
One more honest note: you will have at least one month where you hate it. For most people it lands around month four or five, when the back is shaggy and the front will not tuck. Book your reshaping trim for that exact moment — a good stylist rebalances the proportions in twenty minutes.
FAQs
Which face shapes suit a pixie cut?
Every face shape can wear a pixie cut — the variant matters more than the length. Round faces need height on top and asymmetry, like a deep side part or asymmetrical pixie. Square faces need softness around the jawline, such as side-swept or feathered bangs. Long faces benefit from fringe coverage and side volume. Oval faces suit nearly every variant. The pixies that “fail” on a face shape are almost always the wrong variant, not the wrong length.
How often does a pixie cut need trimming?
Every four to six weeks to maintain the shape. Precision styles like tapered and asymmetrical pixies show regrowth fastest (four weeks); shaggy and textured pixies can stretch to six or eight. Undercuts and faded sides need edging every two to three weeks. Budget for this before you commit — pixie maintenance typically costs more per year in salon visits than long hair.
Can you get a pixie cut with curly hair?
Absolutely — curly pixies are stunning, but they need a stylist experienced with cutting curls dry, because curls spring up significantly once dry. Ask for longer layers than you think you want and expect serious volume — a curly pixie reads bigger and bolder. A curl cream and diffuser become your daily tools, and the wash-and-go factor is genuinely excellent.
Does a pixie cut make you look older or younger?
It depends entirely on the variant. Soft, textured pixies with feathered or side-swept bangs tend to read youthful because they move and soften the face. Severe, scraped-back or ultra-sleek pixies can read older because they expose everything. For a youthful read, choose texture over sleekness, keep softness around the face, and avoid harsh, ultra-short fringes.
How long does it take to grow out a pixie cut?
Roughly eight to twelve months to reach a chin-length bob, since hair grows about half an inch per month. Keep getting reshaping trims every eight to ten weeks — growing through bridge cuts like the bixie and shaggy bob keeps every stage deliberate.
What products do I actually need for a pixie cut?
One good styler matched to your finish: matte clay or paste for textured pixies, pomade for sleek styles, curl cream for wavy or curly pixies. Add a light-hold hairspray if your style needs to survive the day, and a heat protectant if you blow-dry. That is genuinely enough.
Can I style a pixie cut without heat tools?
Yes, if you choose the right variant. Choppy textured pixies, shaggy pixies, and wavy pixies are designed to air-dry — work clay, wax, or curl cream through damp hair and let it set. Sleek, side-parted, and tapered pixies generally need at least a quick blow-dry for lift and direction. Pick your pixie around your real mornings, not your aspirational ones.
Will a pixie cut work on fine, thin hair?
Fine hair is one of the best candidates for a pixie, with the right variant. Choppy texture, deep side parts, and crown layers all create the illusion of density, and short hair cannot drag itself flat the way long fine hair does. Avoid one-length sleek crops, which expose thinness, and ask for point-cut ends — thinning shears can make fine hair look sparser.
The right pixie cut is not the one in the photo you saved — it is the variant of that photo engineered for your texture, your face shape, and your real mornings. Pick from these thirteen with honest eyes, budget for the trims, learn your one product, and the chop will be the best hair decision you have made in years.