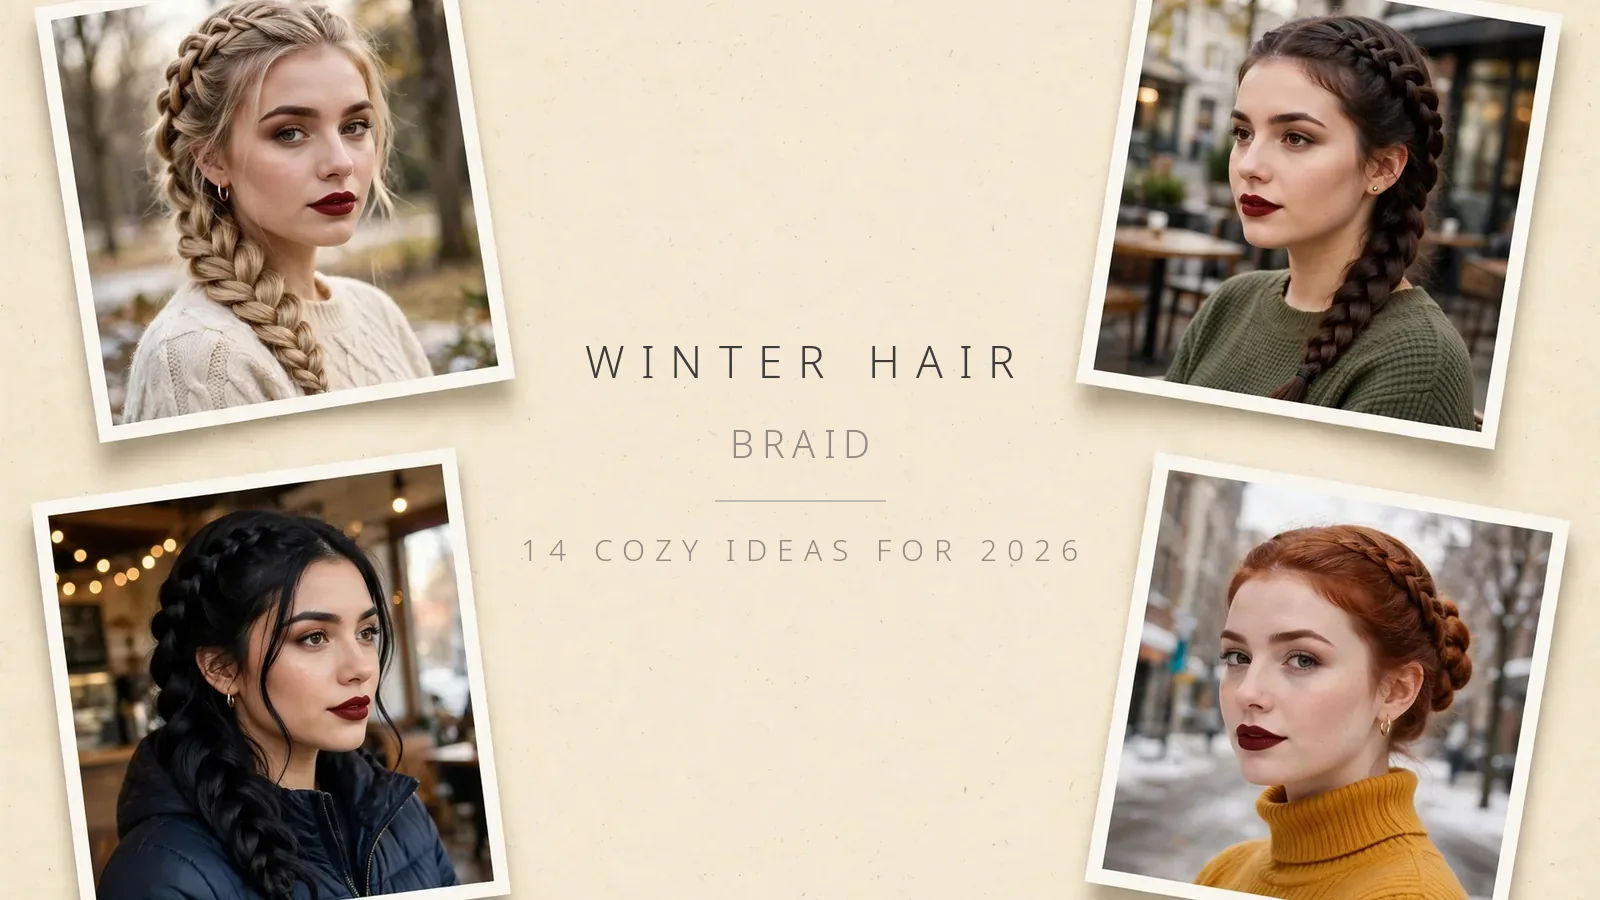
Winter Hair Braid – 14 Cozy Ideas for 2026
Finding a winter hair braid that actually survives the season is harder than it looks. Most pretty braids collapse under a beanie, turn into a static-charged halo by noon, or simply cannot handle the dry indoor heat that makes winter hair so fragile. The gallery-style inspiration posts never tell you which braids work with hats, how to stop the frizz, or why your ends keep snapping against your scarf.
This guide fixes all of that. Below you will find 14 winter hair braid ideas matched to real winter life — styles that fit under beanies, hold up on ski trips, and shine at holiday parties — plus the techniques nobody explains (pull-through braids, ribbon weaving, waterfall braids), honest science on beating static and hat hair, and a chooser framework so you pick the right braid for your hair type and your plans.
Table of Contents
- 14 Winter Hair Braid Ideas Worth Trying
- Loose Side-Swept Fishtail
- Crown Braid With Cashmere Headband
- Low Braided Bun With Velvet Scrunchie
- Double Dutch Braids Under a Beanie
- Rope Twist Half-Up With Pearl Pins
- Pull-Through Braid for Flat Winter Hair
- Bubble Braid With Glitter Ties
- Waterfall Braid With Loose Waves
- Ribbon-Woven Dutch Braid
- Chunky Cable Braid
- Half-Up Braid With Snowflake Clips
- Messy Braided Top Knot
- Braided Headband for Short Hair
- Side Braid With Velvet Bow
- How to Choose the Right Winter Braid for Your Hat, Occasion, and Hair Type
- Winter Hair Science: How Braids Beat Static, Dryness, and Hat Hair
- Fancy Winter Braid Tutorials: Pull-Through, Waterfall, and Ribbon-Weaving Step by Step
- Frequently Asked Questions About Winter Hair Braids
- How do I stop static in my winter braids?
- Which braids work best under a beanie?
- Can I braid my hair when it’s wet in winter?
- How do I fix hat hair after taking my beanie off?
- Are braids actually protective for winter hair?
- What accessories work best for winter braids?
- How long does a pull-through braid take for beginners?
- Can short hair do winter braids?
14 Winter Hair Braid Ideas Worth Trying
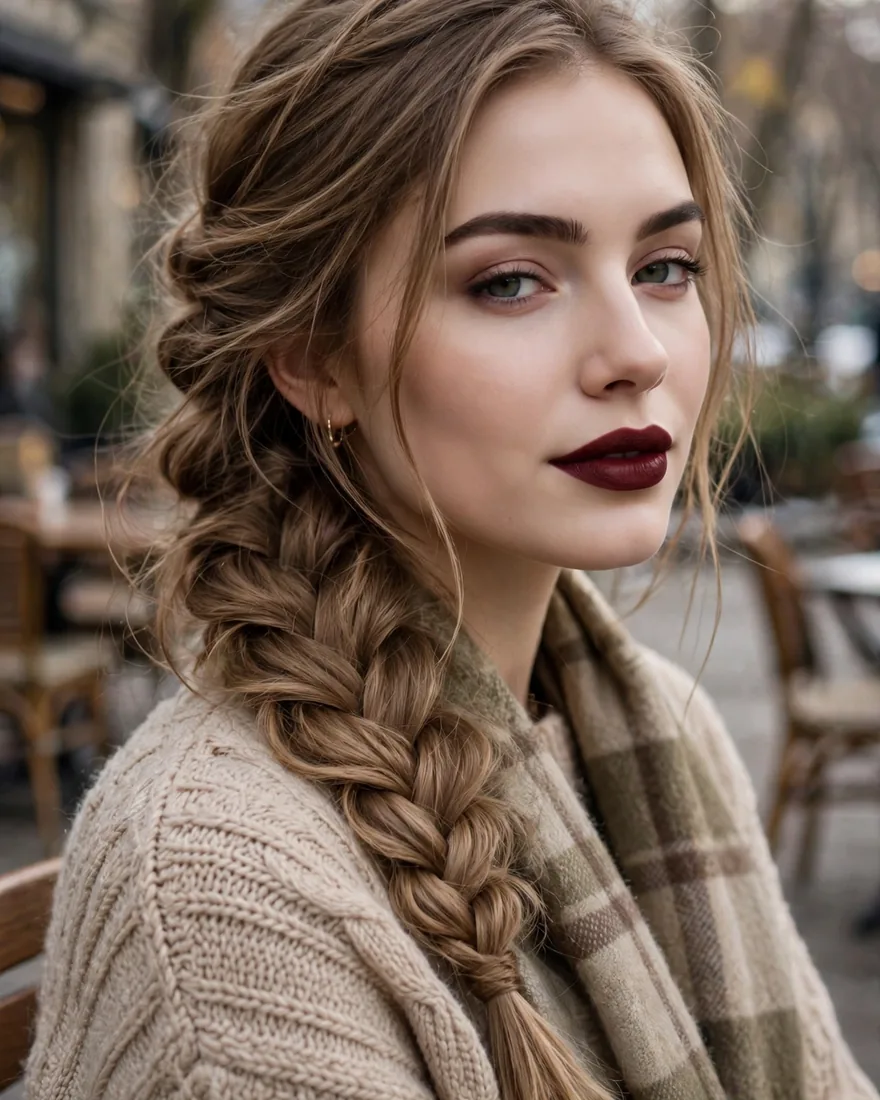
 1. Loose Side-Swept Fishtail
 1. Loose Side-Swept Fishtail
A relaxed fishtail braid swept over one shoulder reads effortlessly romantic against a chunky knit sweater. Keeping it loose on purpose gives the plait a soft, lived-in texture that photographs beautifully in winter light. It is one of the most forgiving winter hair braid options because slight messiness only improves it, making this winter hair braid a reliable daily choice.
Benefits:
- Looks intentionally undone, so frizz and flyaways blend right in
- Sits over one shoulder, keeping ends away from scarf friction
- Works on second-day hair when winter washing schedules stretch out
Pro Tip: Pancake the braid by gently tugging each segment outward after securing the end — this doubles its visual thickness without any backcombing.
How To Style: Sweep all hair to one side and divide into two sections. Take a thin strand from the outside of the left section, cross it over to the inside of the right section, and repeat on the other side. Continue to the ends, secure with a clear elastic, then pancake for fullness.
Best For: Medium to long hair with some natural texture; anyone who wants a pretty braid that survives a commute without touch-ups.
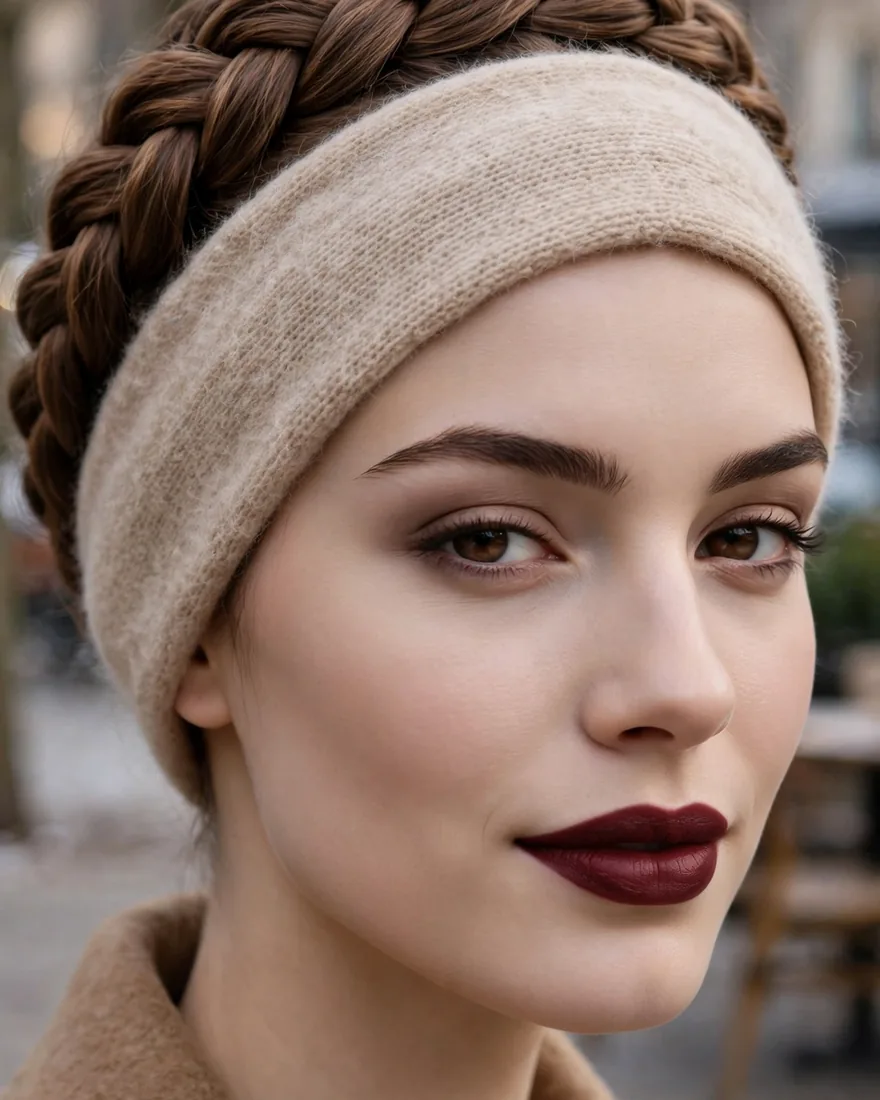
2. Crown Braid With Cashmere Headband
 2. Crown Braid With Cashmere Headband
A Dutch braid wrapped around the head like a crown, finished with a soft cashmere headband, is winter elegance at its warmest. The headband covers the ears against the cold while the braid keeps every strand contained underneath. This winter hair braid pairing looks polished enough for holiday dinners yet feels completely cozy.
Benefits:
- Keeps ears warm without a hat flattening your hair
- All hair tucked away means zero scarf tangles
- The headband hides any imperfect braiding at the hairline
Pro Tip: Braid slightly damp hair with a pea-sized amount of leave-in conditioner — the braid sets smoother and the headband grips better.
How To Style: Create a deep side part and Dutch-braid along the hairline from one ear, around the back, to the other ear. Tuck and pin the tail under the braid’s start. Slide the cashmere headband on just behind the braid to frame it.
Best For: Holiday parties, winter weddings, and office Christmas events where you want to look dressed up but stay warm. See also these bridal hairstyles for more formal inspiration.
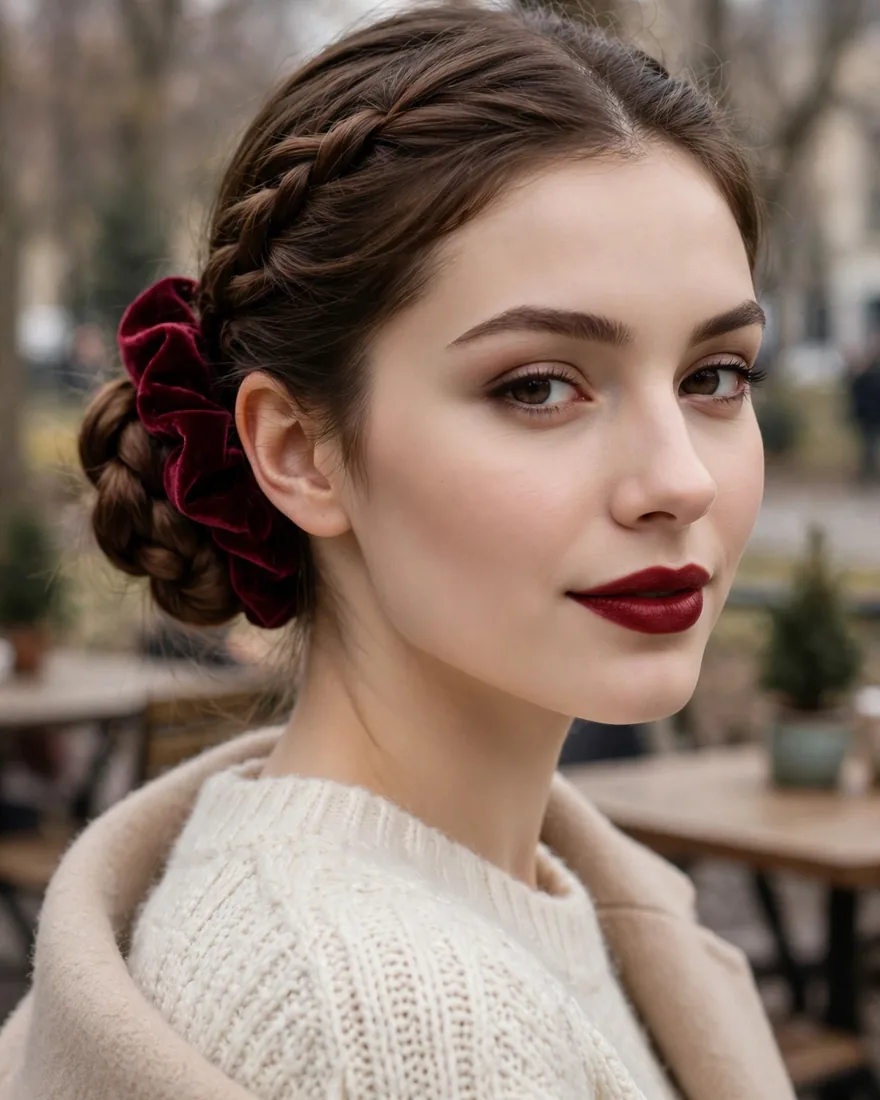
3. Low Braided Bun With Velvet Scrunchie
 3. Low Braided Bun With Velvet Scrunchie
A simple three-strand braid coiled into a low bun and secured with a velvet scrunchie is the ultimate low-effort winter hair braid. The velvet texture reads seasonal and festive without trying too hard, and the low placement sits comfortably under a beanie, which is why this winter hair braid works for busy mornings. It takes five minutes and looks like you tried for twenty.
Benefits:
- Velvet scrunchies cause less breakage than regular elastics in dry winter air
- Low bun placement works under hats and hoods
- The braid texture keeps the bun from looking flat or severe
Pro Tip: Wrap the braid loosely rather than pulling it tight — a relaxed coil looks softer and puts less tension on winter-dry strands.
How To Style: Gather hair into a low ponytail and braid it to the ends. Coil the braid around its base, pinning as you go, then wrap the velvet scrunchie around the whole bun twice to secure and decorate.
Best For: Busy winter mornings, school runs, and anyone growing out layers that won’t stay in a smooth bun.
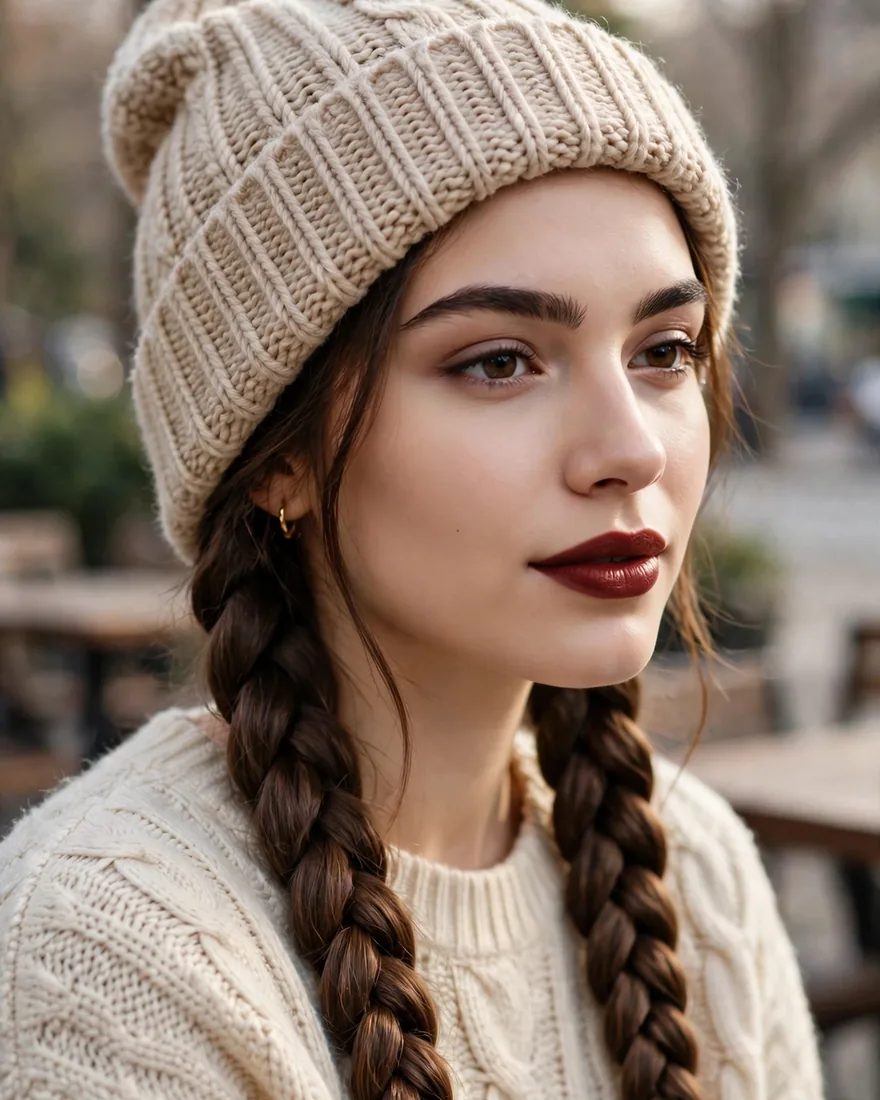
4. Double Dutch Braids Under a Beanie
 4. Double Dutch Braids Under a Beanie
Two Dutch braids are the undisputed champion of hat hair — they lie flat enough for a beanie to slide on without lumps, and they look perfect when the hat comes off. This is the winter hair braid to choose for ski trips, snowy hikes, and ice skating. Nothing else stays this secure through a full day of winter activity, making it the most practical winter hair braid for active days.
Benefits:
- Braids lie flat so beanies fit comfortably with no bumps
- Hair stays secure through skiing, skating, and wind
- When you remove the hat, the braids look intentional — not flattened
Pro Tip: Braid all the way to the very ends and secure with small elastics, then tuck the tails into your coat collar to protect them from wind and scarf friction.
How To Style: Part hair down the middle. Dutch-braid each side from the hairline to the nape, keeping the braids close to the scalp. Continue as regular three-strand braids past the shoulders and secure. Pull on the edges lightly for a slightly fuller look.
Best For: Active winter days, long hair that tangles in wind, and anyone who lives in a beanie from November to March. Explore more dutch braid hairstyles for year-round variations.
5. Rope Twist Half-Up With Pearl Pins
 5. Rope Twist Half-Up With Pearl Pins
Two rope twists pinned at the back of the head with pearl pins create a delicate, jewelry-like effect that suits the holiday season perfectly. The rope twist is faster than braiding and holds well in fine hair that slips out of regular plaits. Pearl pins catch winter light beautifully in photos.
Benefits:
- Rope twists take two minutes per side — faster than any braid
- Holds better in fine, slippery hair than three-strand braids
- Pearl pins double as earrings-level sparkle for holiday photos
Pro Tip: Twist both sections in the same direction, then wrap them around each other in the opposite direction — this is what locks a rope twist so it doesn’t unravel.
How To Style: Take a two-inch section from each temple, twist each section tightly in one direction, then cross them over each other in the opposite direction. Pin at the back of the head and decorate with pearl pins along the twist.
Best For: Fine to medium hair, holiday dinners, and New Year’s Eve when you want sparkle without a full updo.
6. Pull-Through Braid for Flat Winter Hair
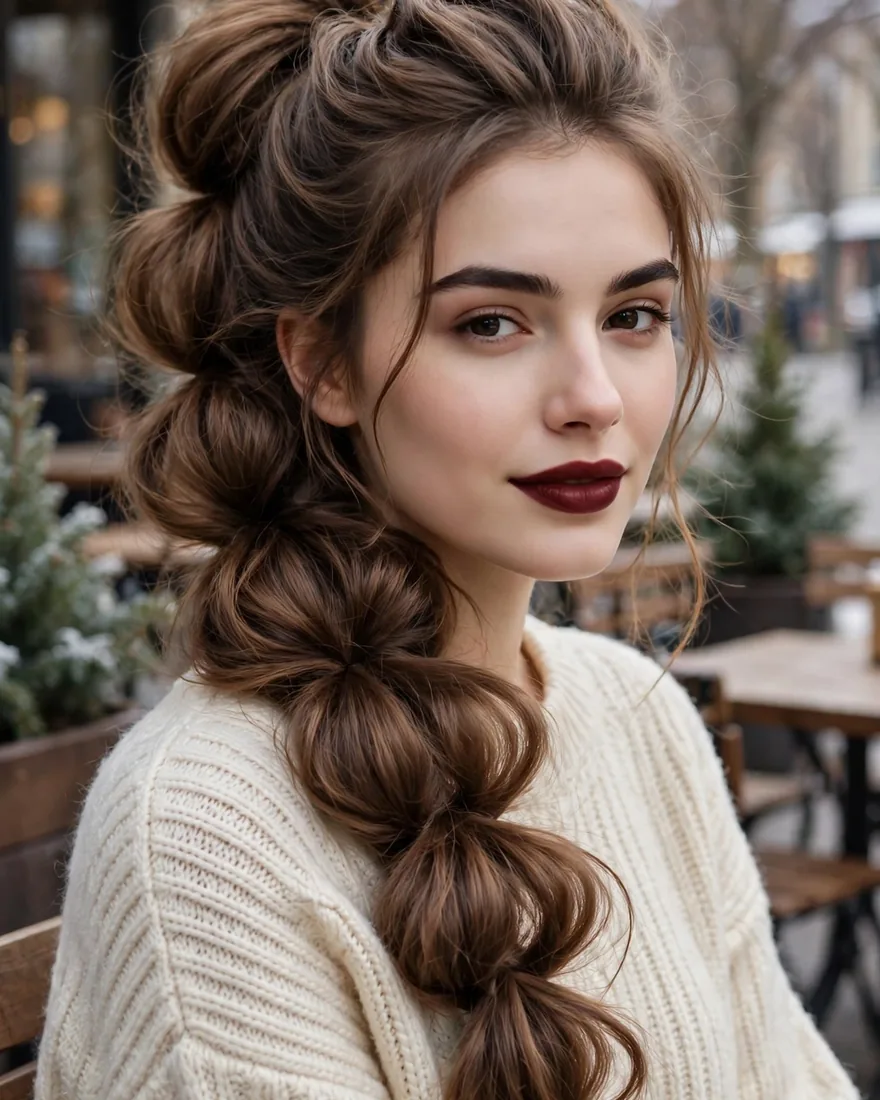 6. Pull-Through Braid for Flat Winter Hair
The pull-through braid isn’t a true braid at all — it’s a series of ponytails looped through each other — which makes it the best winter hair braid for fine, flat hair that winter hats compress even further. It creates dramatic, chunky volume that no real braid can match on thin hair. Once you learn the looping motion, it takes under ten minutes, and this winter hair braid delivers volume no ordinary plait can match.
Benefits:
- Creates twice the volume of a real braid on fine hair
- Stays puffy all day without backcombing or teasing
- Easier than French braiding — no new sections to feed in
Pro Tip: Use clear mini elastics and pancake each looped section immediately after pulling it through — waiting until the end makes the sections harder to fluff evenly.
How To Style: Gather the top section into a ponytail. Gather a second section below it into another ponytail. Split the first ponytail in half, bring the halves around the second ponytail, and clip them together underneath. Repeat down the head, then gently pull each section outward for volume.
Best For: Fine, flat, or thin hair that needs serious volume; anyone who has never mastered French braiding.
7. Bubble Braid With Glitter Ties
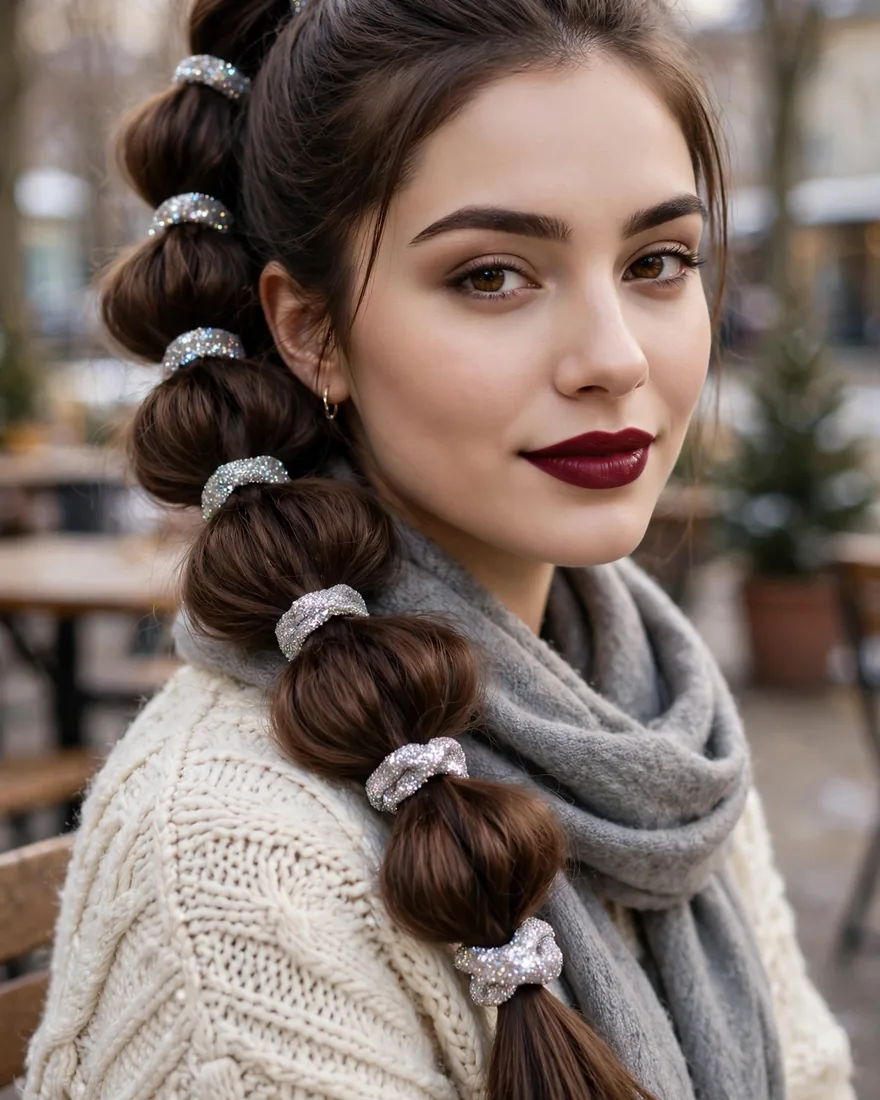 7. Bubble Braid With Glitter Ties
A bubble braid — a ponytail sectioned with elastics and puffed into bubbles — dressed up with glitter ties is pure holiday-party fun. It works on almost any hair length past the shoulders and takes genuine skill out of the equation. This winter hair braid turns heads at Christmas parties without requiring any braiding ability at all.
Benefits:
- Requires zero braiding skill — just ponytails and elastics
- Glitter ties make it instantly party-ready
- The bubbles hide uneven lengths and layers
Pro Tip: Space your elastics two to three inches apart and puff each bubble before moving to the next — consistent spacing is what makes it look polished rather than lumpy.
How To Style: Pull hair into a high or low ponytail. Place elastics down the length at even intervals. Gently tug each section outward between elastics to form round bubbles. Swap the last few elastics for glitter ties.
Best For: Christmas and New Year parties, medium to long hair, and beginners who want a statement style. For more party-ready looks, browse these prom hairstyles.
8. Waterfall Braid With Loose Waves
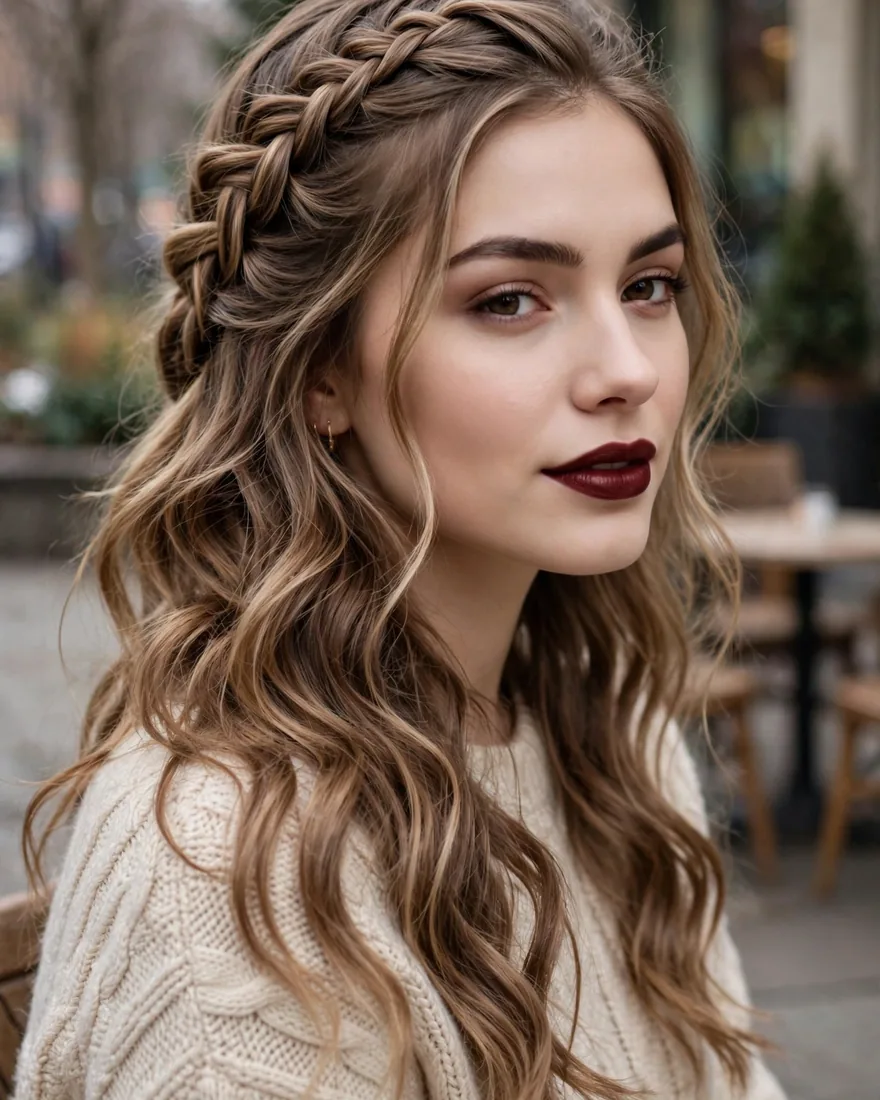 8. Waterfall Braid With Loose Waves
A waterfall braid lets strands cascade through the plait like falling water, and paired with loose waves it creates the dreamiest romantic winter hair braid. The technique looks complicated but follows a simple drop-and-pick-up rhythm. It frames the face softly, which flatters everyone in harsh winter lighting, and this romantic winter hair braid photographs beautifully.
Benefits:
- The cascading strands soften the face in unflattering winter light
- Looks intricate while using a simple repeating motion
- Half-up structure keeps hair off the face but shows off length
Pro Tip: Keep the dropped strands consistent in thickness — uneven drops are the main reason waterfall braids look messy instead of magical.
How To Style: Start a French braid at one temple. Each time you would cross the top strand over, drop it instead and pick up a new section of hair from just below it. Continue across the back of the head to the other side and pin. Curl the remaining hair into loose waves.
Best For: Date nights, winter formal events, and long layered hair where the falling strands show beautifully. Pair with delicate baby braid hairstyles for extra detail.
9. Ribbon-Woven Dutch Braid
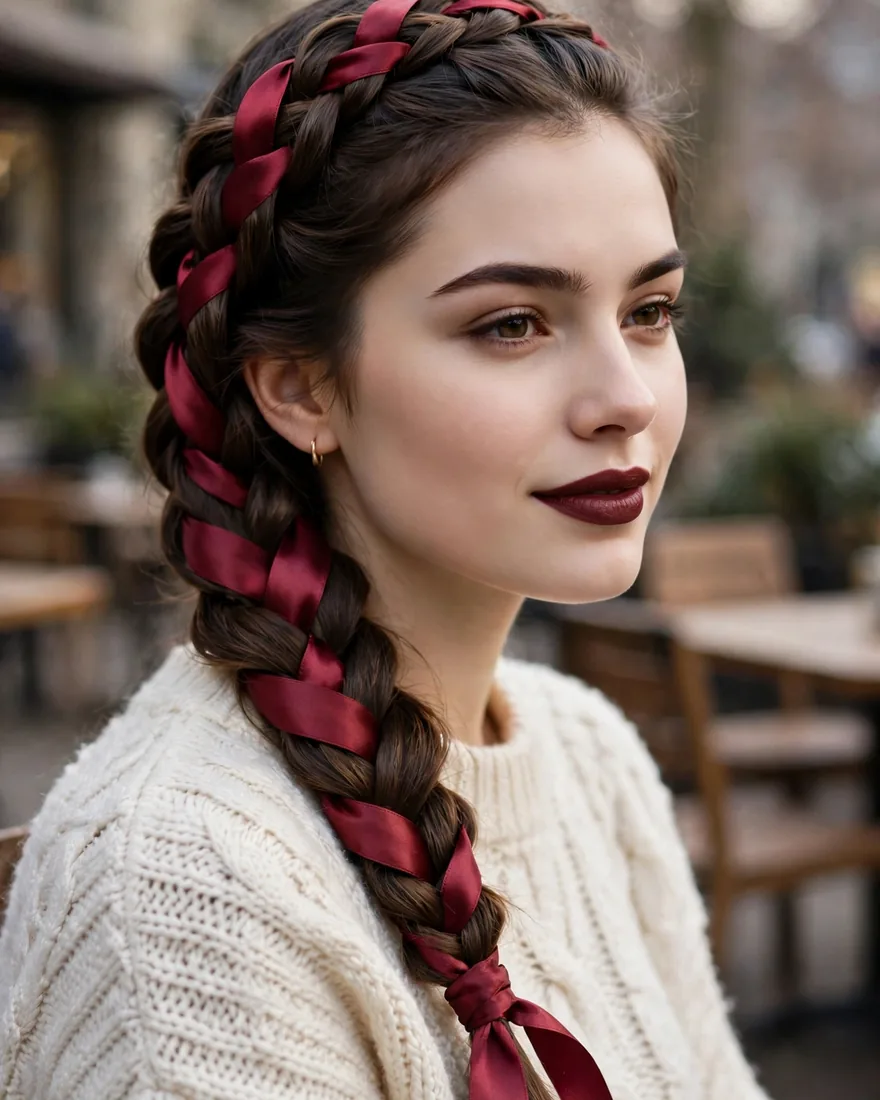 9. Ribbon-Woven Dutch Braid
Weaving a velvet or satin ribbon through a Dutch braid as the fourth strand turns a everyday plait into something gift-wrapped and festive. The ribbon adds color, texture, and a holiday feel that plain braids can’t match. Choose deep green, burgundy, or gold ribbon for maximum winter impact with this festive winter hair braid.
Benefits:
- Instantly festive — the ribbon does all the decorative work
- Adds grip that helps slippery winter hair stay braided
- The bow at the end replaces the need for a fancy hair tie
Pro Tip: Anchor the ribbon at the crown with a bobby pin before you start braiding, and keep it as the outer strand on each crossover so it stays visible.
How To Style: Pin a long ribbon at the crown where your braid will start. Dutch-braid as normal, treating the ribbon as a fourth strand woven through the outer sections. Tie the ribbon into a bow at the end over your elastic.
Best For: Christmas markets, holiday photos, and anyone who wants a braided style that looks gift-wrapped.
10. Chunky Cable Braid
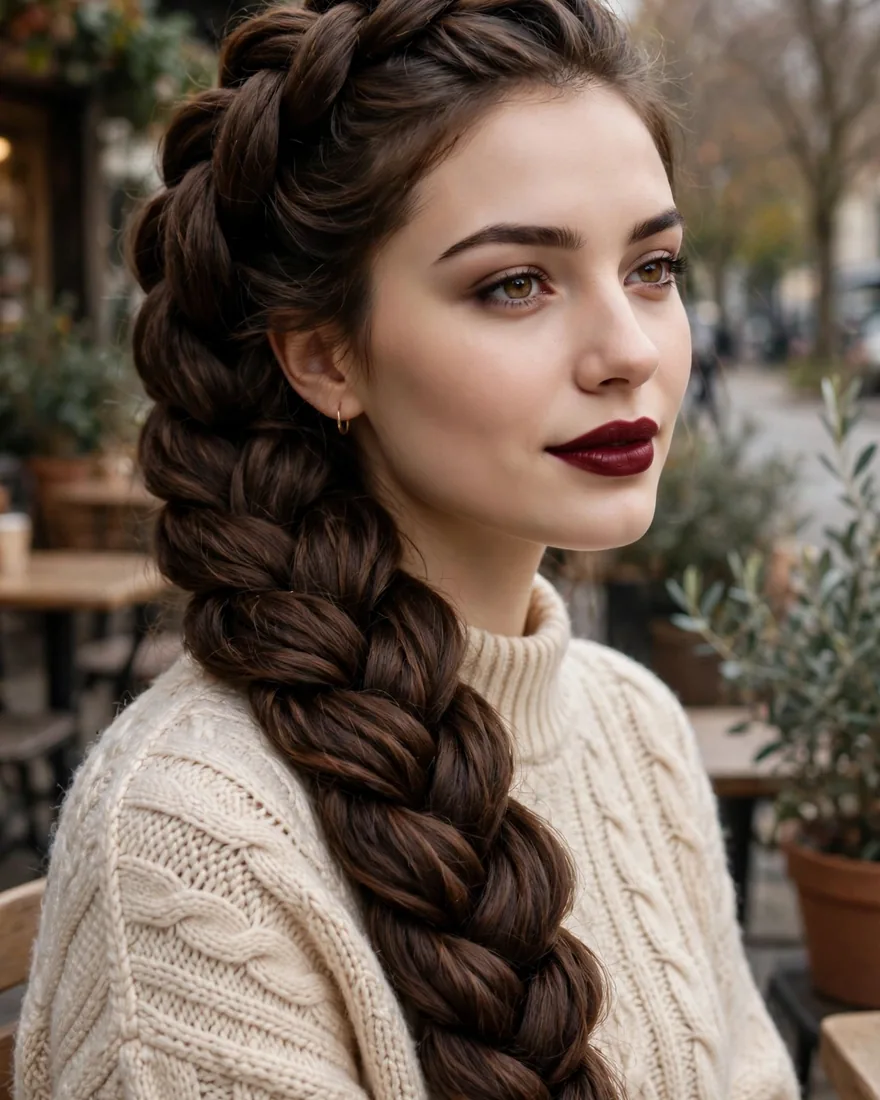 10. Chunky Cable Braid
A cable braid — two rope twists cabled around each other — creates a thick, rope-like plait with beautiful dimension that stands up to heavy winter coats and scarves. It looks substantial and cozy, like a knit sweater for your hair. This winter hair braid works especially well on thick hair that overwhelms daintier styles.
Benefits:
- The thick structure resists being crushed by scarves and collars
- Shows off dimension and shine in long hair
- Holds its shape all day with minimal pins
Pro Tip: Work with four sections total — two rope twists, each made of two strands — and keep the twisting direction consistent or the cable will loosen.
How To Style: Divide hair into two large sections. Rope-twist each section (twist strands one way, wrap the other way). Then cable the two rope twists around each other in the same direction as the original twists. Secure with an elastic and pancake lightly.
Best For: Thick, long hair; cold-weather commutes where your style needs to survive a heavy coat.
11. Half-Up Braid With Snowflake Clips
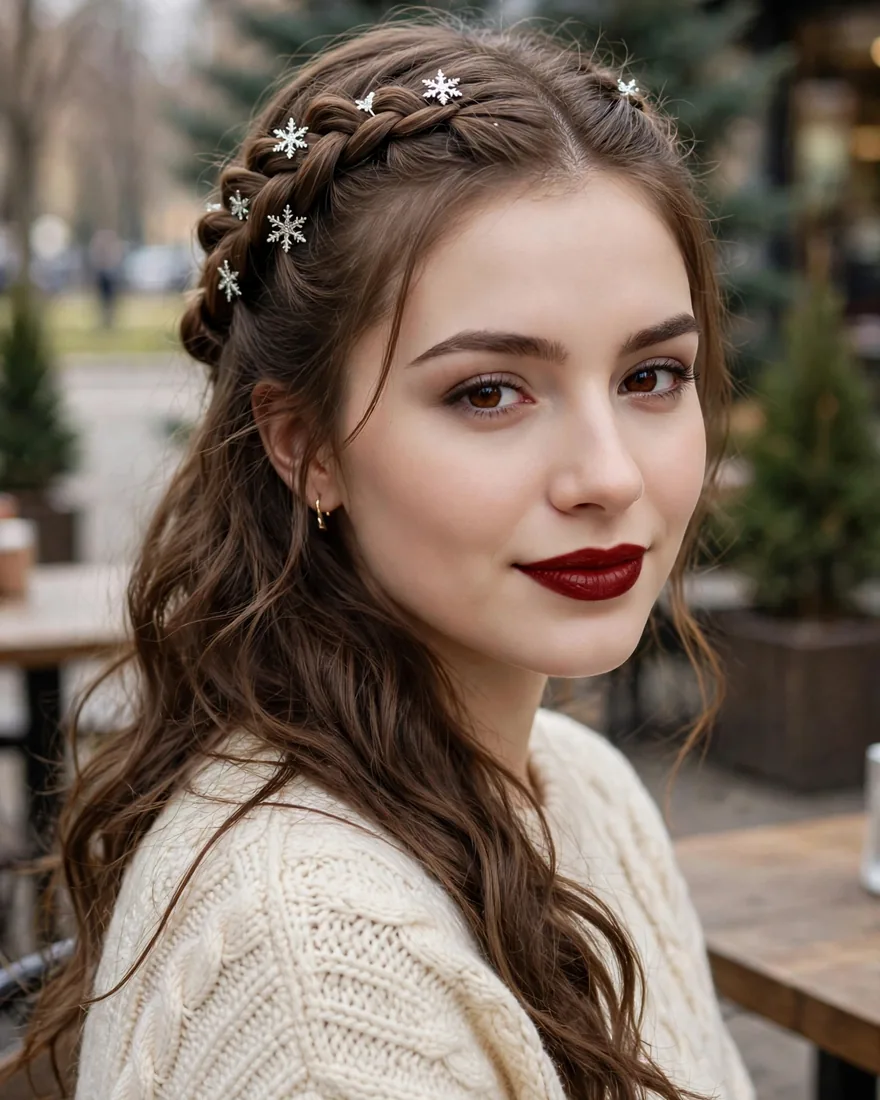 11. Half-Up Braid With Snowflake Clips
A simple half-up braid decorated with snowflake clips captures winter whimsy without veering into costume territory. The half-up structure keeps hair off your face while leaving length down to show off. Snowflake clips are inexpensive, reusable, and photograph adorably against dark winter hair, making this an easy seasonal winter hair braid.
Benefits:
- Takes five minutes but looks seasonally intentional
- Snowflake clips work on any braid as instant winter decoration
- Half-up keeps vision clear on windy winter walks
Pro Tip: Place clips asymmetrically — a cluster of two or three on one side looks chic, while symmetrical placement can read juvenile.
How To Style: Gather the top half of your hair and braid it into a simple three-strand plait. Secure with a clear elastic and pin the end flat against the back of your head. Clip snowflake clips along one side of the braid.
Best For: School, casual winter outings, and festive occasions where you want a touch of seasonal fun.
12. Messy Braided Top Knot
 12. Messy Braided Top Knot
Braiding the hair before twisting it into a top knot adds texture and grip that a plain top knot lacks, especially on slippery winter hair. The messiness is the point — this winter hair braid embraces the undone aesthetic while keeping everything off your neck and out of your scarf. It is the fastest protective style on this list and a practical winter hair braid for unwashed hair days.
Benefits:
- Keeps all hair off the neck and away from scarf friction
- The braid texture grips better than smooth hair in a knot
- Takes three minutes and suits unwashed winter hair perfectly
Pro Tip: Braid only to mid-length before coiling — leaving the ends out of the braid gives the knot a softer, more textured finish.
How To Style: Pull hair into a high ponytail and braid it loosely to the ends. Coil the braid around its base into a knot and pin securely. Pull out a few face-framing pieces and gently tug the knot for fullness.
Best For: Gym sessions, snowy-day errands, and third-day hair that needs to look intentional.
13. Braided Headband for Short Hair
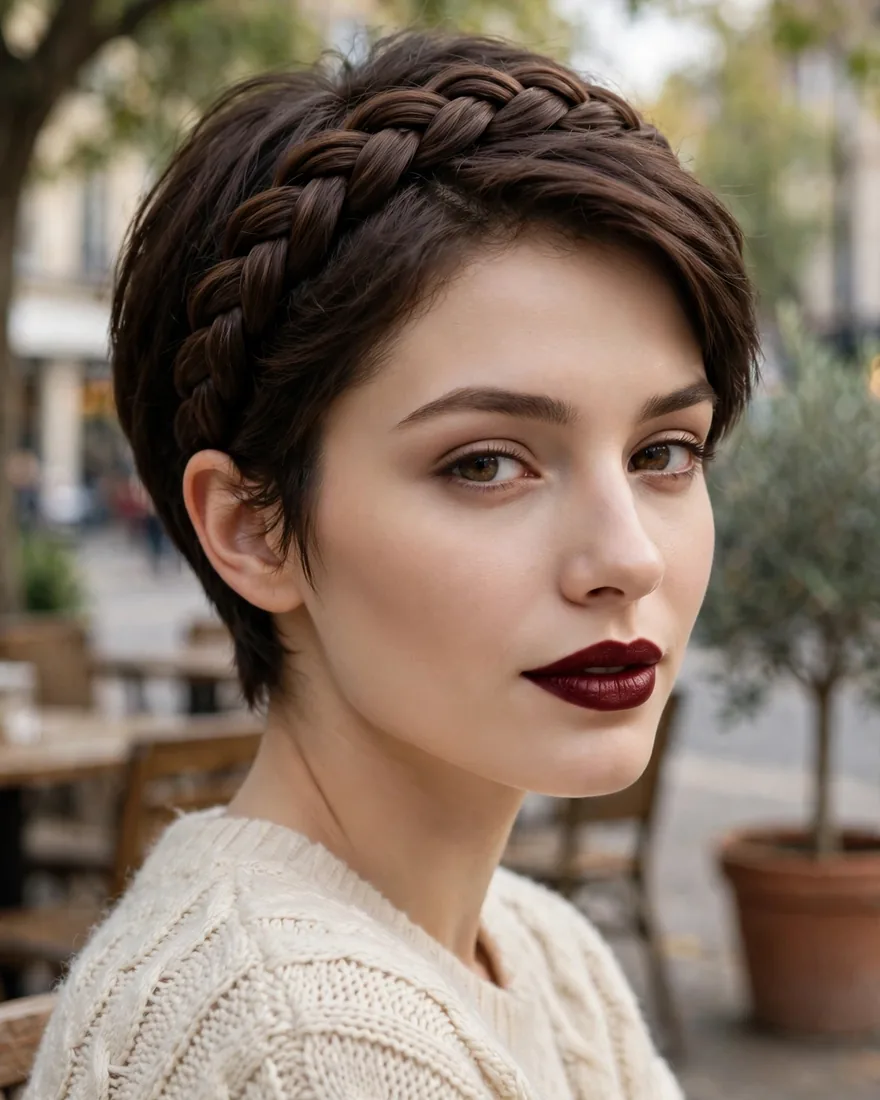 13. Braided Headband for Short Hair
Short hair doesn’t have to sit out the winter hair braid season — a Dutch braid worked across the front hairline creates a braided headband effect that keeps bangs and layers off the face. It adds visual interest to bobs and lobs while serving a practical purpose. Pair it with a beanie for the cutest cold-weather combination — proof that short hair can enjoy a winter hair braid too.
Benefits:
- Gives short hair a braided option without needing length
- Keeps bangs off the face on windy days
- Sits flat enough to wear under a beanie
Pro Tip: Use a light-hold mousse on the front sections before braiding — short layers slip out of braids easily without product.
How To Style: Part hair deeply on one side. Dutch-braid a two-inch section along the hairline from the part toward the opposite ear, adding hair only from the front. Pin the end behind the ear and let the rest of the hair fall naturally.
Best For: Bobs, lobs, and pixie grows-outs; anyone with bangs that misbehave in winter wind.
14. Side Braid With Velvet Bow
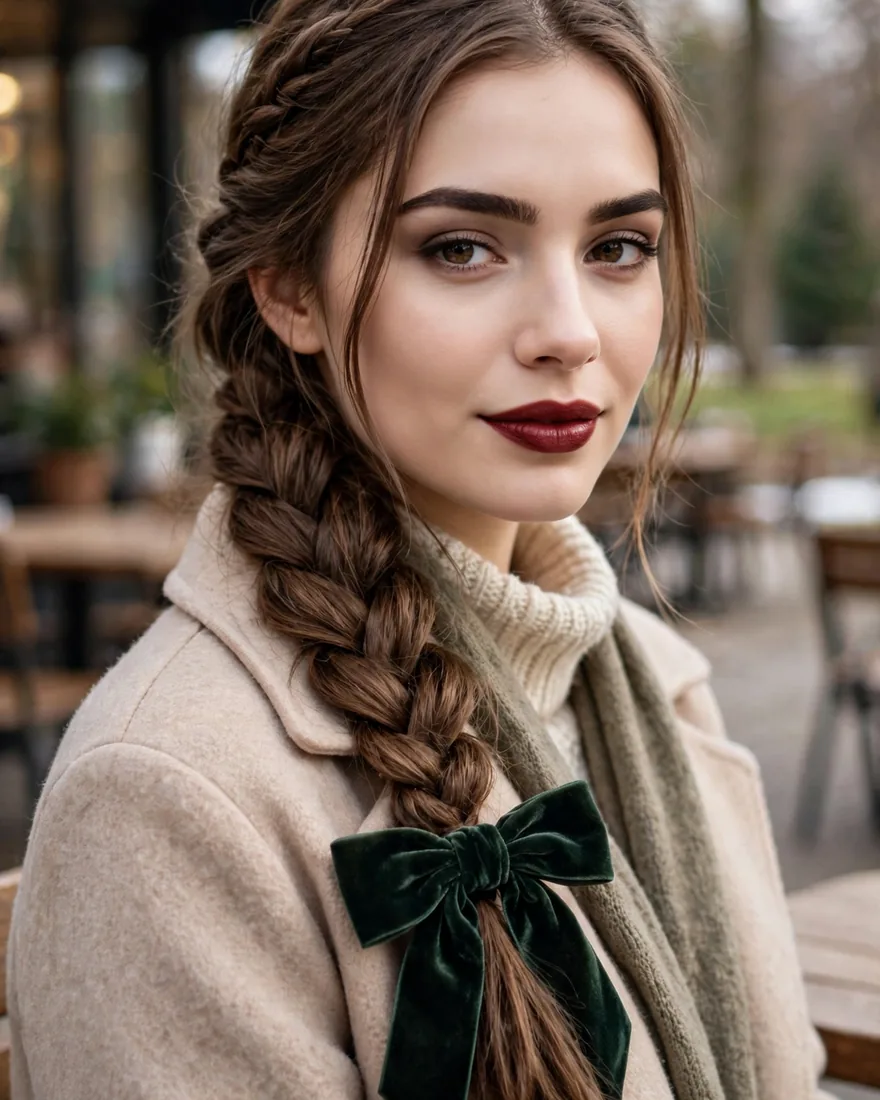 14. Side Braid With Velvet Bow
A classic side braid finished with an oversized velvet bow is timeless winter romance — think ice-skating dates and Christmas Eve. The side placement keeps the braid visible from the front, so the style reads in photos. Velvet bows are having a major moment and elevate the simplest plait into something special, making this classic winter hair braid feel fresh again.
Benefits:
- The side placement shows off the braid in photos
- A velvet bow makes even a basic braid look dressed up
- Keeps hair contained on one side, away from coat zippers
Pro Tip: Choose a bow with an alligator clip rather than a tie — it grips the end of the braid more securely and is easier to reposition.
How To Style: Sweep all hair over one shoulder and braid loosely to the ends. Secure with a clear elastic, then pancake the braid for fullness. Clip the velvet bow over the elastic, fluffing the braid once more after.
Best For: Holiday dates, winter photoshoots, and romantic occasions when you want classic femininity.
How the 14 winter hair braid ideas compare at a glance:
| Style | Beanie-Friendly | Skill Level | Best Occasion |
|---|---|---|---|
| Loose Side-Swept Fishtail | No | Easy | Everyday / casual |
| Crown Braid With Cashmere Headband | Yes | Medium | Holiday parties |
| Low Braided Bun With Velvet Scrunchie | Yes | Easy | Work / school |
| Double Dutch Braids Under a Beanie | Yes | Medium | Skiing / active |
| Rope Twist Half-Up With Pearl Pins | Somewhat | Easy | Holiday dinners |
| Pull-Through Braid for Flat Winter Hair | Somewhat | Easy | Everyday volume |
| Bubble Braid With Glitter Ties | No | Easy | Christmas parties |
| Waterfall Braid With Loose Waves | No | Hard | Date night / formal |
| Ribbon-Woven Dutch Braid | Somewhat | Medium | Christmas markets |
| Chunky Cable Braid | Yes | Medium | Commuting / cold days |
| Half-Up Braid With Snowflake Clips | Somewhat | Easy | Casual festive |
| Messy Braided Top Knot | No | Easy | Gym / errands |
| Braided Headband for Short Hair | Yes | Medium | Everyday / short hair |
| Side Braid With Velvet Bow | Somewhat | Easy | Holiday dates |
How to Choose the Right Winter Braid for Your Hat, Occasion, and Hair Type
Not every winter hair braid suits every winter situation, so match the winter hair braid to your day before you start braiding. If you’re wearing a beanie, choose flat-to-the-scalp styles like double Dutch braids or a braided headband — anything with volume at the crown will create uncomfortable lumps under a hat. For a bare-headed holiday party, go for dimension and decoration: waterfall braids, ribbon-woven plaits, and bubble braids photograph beautifully and don’t need to survive headwear.
Hair type matters just as much. Fine, slippery hair holds rope twists and pull-through braids far better than classic three-strand plaits, which tend to loosen by noon. Thick, heavy hair needs substantial structures — chunky cable braids and braided buns distribute weight comfortably, while tiny braids disappear into dense hair. Curly and coily hair benefits most from braids as protective styles that shield ends from dry indoor heat and scarf friction; keep them moisturized underneath with a leave-in conditioner.
Finally, think about your wash schedule. Winter’s dry air lets most people stretch washes longer, and braids are the perfect second- or third-day style — they grip better on slightly lived-in hair anyway. If you’re planning around Christmas hairstyles for a specific event, do a trial run a few days before so you’re not learning a waterfall braid on the morning of the party.
Winter Hair Science: How Braids Beat Static, Dryness, and Hat Hair
Winter static happens because cold air holds less moisture, and dry hair strands build up electrical charge every time they rub against hats, scarves, and coats. The fix starts before braiding your winter hair braid: work a pea-sized amount of leave-in conditioner or a drop of hair oil through mid-lengths and ends while hair is slightly damp. An anti-static spray on your brush — and lightly over the finished braid — neutralizes the charge that makes strands fly. Metal combs generate less static than plastic ones, a small swap with a big payoff.
Dry indoor heating is the other winter enemy, pulling moisture from hair for hours every day. Braids are genuinely protective here: tucking your ends into a braided bun or a plait keeps them from rubbing against wool scarves and coat collars, which is where most winter breakage happens. Sleeping in a loose braid also cuts down on pillow friction. For textured hair, fulani braids and other contained styles lock in the moisture from your wash-day routine through the driest weeks.
Hat hair — that flat, creased, staticky aftermath of removing a beanie — is largely preventable. Braids that lie close to the scalp don’t get crushed the way loose hair does, which is why double Dutch braids emerge from under a hat looking perfect. If you must wear loose hair under a hat, flip your head upside down and shake at the roots when the hat comes off, then smooth a tiny amount of dry shampoo through the crown to restore volume and absorb the hat-line crease.
Fancy Winter Braid Tutorials: Pull-Through, Waterfall, and Ribbon-Weaving Step by Step
The pull-through braid looks like an elaborate plait but uses only ponytails, making it the easiest fancy winter hair braid to learn. Start with a half-up ponytail at the crown. Make a second ponytail directly below it, incorporating a little more hair. Split the first ponytail into two halves, bring them around the second ponytail, and join them underneath with a clear elastic — this creates the first looped segment. Repeat the sequence down the head, then gently tug each segment outward for that signature chunky volume. The whole thing takes about ten minutes once the motion clicks.
The waterfall braid follows a drop-and-replace rhythm. Begin a French braid at one temple, but each time the top strand comes over, let it drop down through your fingers instead of continuing the plait, and pick up a fresh section of hair from right below the drop point. The dropped strands become the “waterfall” while the braid itself travels horizontally. Keep your tension even and the dropped sections uniform in size — consistency is what separates a dreamy waterfall from a tangled mess. Finish by pinning the end behind the opposite ear and curling the loose hair for maximum effect.
Ribbon weaving adds the festive factor. Cut a ribbon about twice the length of your hair and anchor it at the crown with a bobby pin where the braid begins. Braid a Dutch plait, treating the ribbon as a permanent fourth strand that you weave through the outer sections on every crossover. Keep the ribbon slightly loose so it doesn’t pucker the braid. When you reach the ends, tie the ribbon in a bow over your elastic — the bow is the whole point, so make it generous. Velvet ribbon in burgundy or forest green photographs beautifully against winter outfits, and a high ponytail base makes the ribbon easier to control if you’re new to weaving.
Frequently Asked Questions About Winter Hair Braids
How do I stop static in my winter braids?
Start with slightly damp hair and work a pea-sized amount of leave-in conditioner through the lengths before braiding. Spritz an anti-static spray over the finished braid, and switch to a metal comb instead of plastic. Keeping ends tucked into the braid rather than loose also cuts down the rubbing that creates static charge.
Which braids work best under a beanie?
Flat-to-the-scalp styles win here: double Dutch braids, a braided headband, or a low braided bun all slide under a beanie without lumps. Avoid anything with volume at the crown, like high bubble braids or top knots, which press uncomfortably under hats and emerge misshapen.
Can I braid my hair when it’s wet in winter?
It’s better to braid damp — not soaking — hair in winter. Soaking wet hair takes much longer to dry in cold weather, and going outside with a wet braid can leave hair stiff and fragile. Towel-dry first, apply leave-in conditioner, then braid once hair is just damp.
How do I fix hat hair after taking my beanie off?
Flip your head upside down and shake gently at the roots to restore volume, then smooth a small amount of dry shampoo through the crown to lift the hat-line crease. If you know you’ll be removing your hat indoors, choose a close-to-scalp winter hair braid in the first place — braids don’t get hat hair the way loose hair does.
Are braids actually protective for winter hair?
Yes — braids are one of the best protective styles for winter because they keep fragile ends tucked away from scarf friction, coat collars, and dry heated air, which are the main causes of winter breakage. Keep the braids moisturized underneath and don’t braid too tightly, since tension plus dryness can cause breakage at the hairline.
What accessories work best for winter braids?
Velvet scrunchies and bows, pearl pins, snowflake clips, and satin ribbons all read seasonal without looking costumey. Avoid metal accessories that get ice-cold outdoors, and skip anything with sharp edges that can snag dry winter hair.
How long does a pull-through braid take for beginners?
About fifteen to twenty minutes the first time, dropping to under ten once the looping motion becomes automatic. It’s faster to learn than French braiding because you’re only making ponytails — no new sections to feed in. Practice on slightly dirty hair, which grips better than freshly washed strands.
Can short hair do winter braids?
Absolutely — a braided headband across the front hairline works on bobs and lobs, and half-up mini braids suit shorter lengths. Use a light mousse for grip since short layers slip out easily, and keep the braids close to the scalp so they sit flat under a beanie.
A great winter hair braid does more than look pretty — it protects your hair from the season’s worst offenders while keeping you warm and polished. Whether you choose beanie-proof double Dutch braids for the slopes, a ribbon-woven plait for the Christmas market, or a five-minute braided top knot for a snowy errand run, the right braid makes winter hair easier, not harder. Pick one idea from this list, practice it once before the big day, and enjoy a season of good hair days no matter what the weather does.