
Curly Shag – 13 Bouncy Looks for Every Curl Type in 2026
Most curl inspiration fails because of one thing: the photo you love was cut on a completely different curl pattern, density, and shrinkage level than yours. A curly shag looks effortless in a gallery, but without the right layer placement for your actual texture, you can walk out of the salon with a shape that goes wide instead of bouncy — the dreaded triangle.
That is exactly what this guide fixes. Below you get 13 looks matched to real curl types, density levels, and daily effort — plus the salon language to ask for, a wash-day routine that keeps the layers alive, and honest grow-out timelines. Every pick names who it suits, so you choose the right shag instead of just browsing.
Table of Contents
- 13 Curly Shag Looks Worth Trying
- 1. Tight-Curl Shag with Face-Framing Layers
- 2. Soft Curly Shag for Fine Hair
- 3. Rounded Curly Shag for Thick Hair
- 4. Long Curly Shag with Curtain Bangs
- 5. Short Curly Shag with Full Bangs
- 6. Side-Parted Curly Shag
- 7. Loose-Curl Shag with Long Layers
- 8. Chin-Length Curly Shag Bob
- 9. Curly Shag with Micro Bangs
- 10. Curly Shag without Bangs
- 11. Curly Wolf-Shag
- 12. Wash-and-Go Curly Shag with Bottleneck Fringe
- 13. Copper-Tinted Curly Shag with Layers
- How to Choose the Right Curly Shag for Your Curl Type and Density
- What to Ask Your Stylist: Dry or Wet Cut, Shrinkage, and How the Shag Grows Out
- Curly Shag Wash-Day and Refresh-Day Routine
- FAQs
- Will this cut work on fine hair?
- How do I avoid the triangle shape with this cut?
- Should I get a dry cut or a wet cut for a shag?
- How often do I need a trim to keep the shag shape?
- Can I get a shag without bangs?
- How does a shag grow out?
- What products work best for styling a shag?
- Will a shag work on 4C coily hair?
13 Curly Shag Looks Worth Trying
1. Tight-Curl Shag with Face-Framing Layers
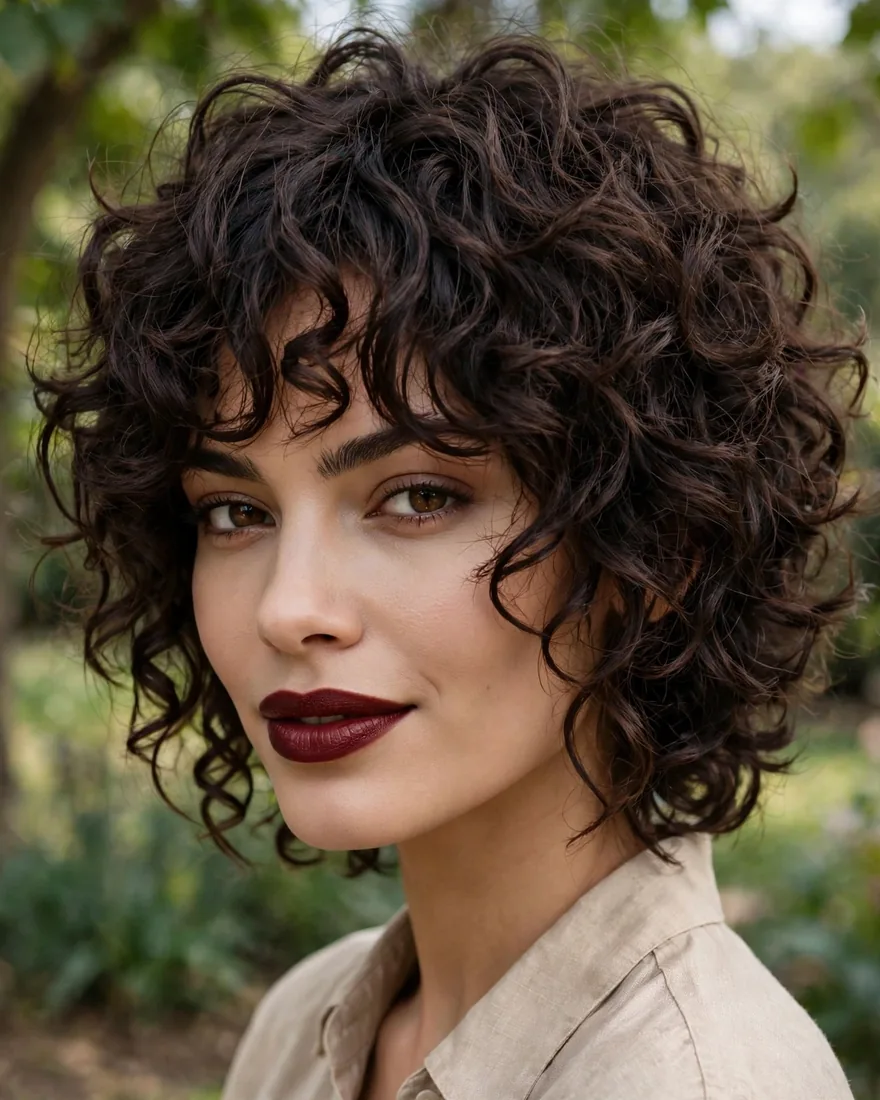
Springy 3B–3C coils get their bounce from short internal layers that lift the crown while longer face-framing pieces keep length around the cheeks. The top layers are cut shorter so volume sits high, not wide. This is the classic shag silhouette — rounded, airy, and full of movement.
- Benefits:
- Lifts roots so curls spring up instead of hanging flat
- Face-framing layers open up the face and soften strong features
- Removes bulk where tight curls naturally stack up
- Pro Tip: Ask the stylist to cut the shortest crown layer dry — tight coils shrink up to 50%, and a wet cut almost always comes out shorter than planned.
- How To Style: Apply curl cream to soaking-wet hair in sections, then scrunch a pea-sized amount of mousse at the roots. Diffuse on medium heat with the head flipped upside down until 90% dry.
- Best For: 3B–3C curls, medium to thick density, and anyone whose hair falls flat at the crown by midday.
2. Soft Curly Shag for Fine Hair

Fine curls need a gentler version of the shag — long, barely-there layers instead of aggressive chunking. Weight is removed only through the mid-lengths so the ends keep their fullness. If you want the movement of a shag without sacrificing density, compare it with these short shaggy haircut ideas to see how layer length changes the silhouette.
- Benefits:
- Creates movement without thinning already-delicate ends
- Makes fine curls look fuller by encouraging them to clump
- Low-maintenance grow-out since layers are subtle
- Pro Tip: Skip the razor on fine curls — a clean scissor cut keeps the ends from looking wispy after two weeks.
- How To Style: Use a lightweight curl foam rather than heavy creams, which weigh fine hair down. Scrunch upward and air-dry or diffuse on low speed.
- Best For: Fine to medium-density 2C–3A curls, and anyone worried this cut will make their hair look thinner.
3. Rounded Curly Shag for Thick Hair
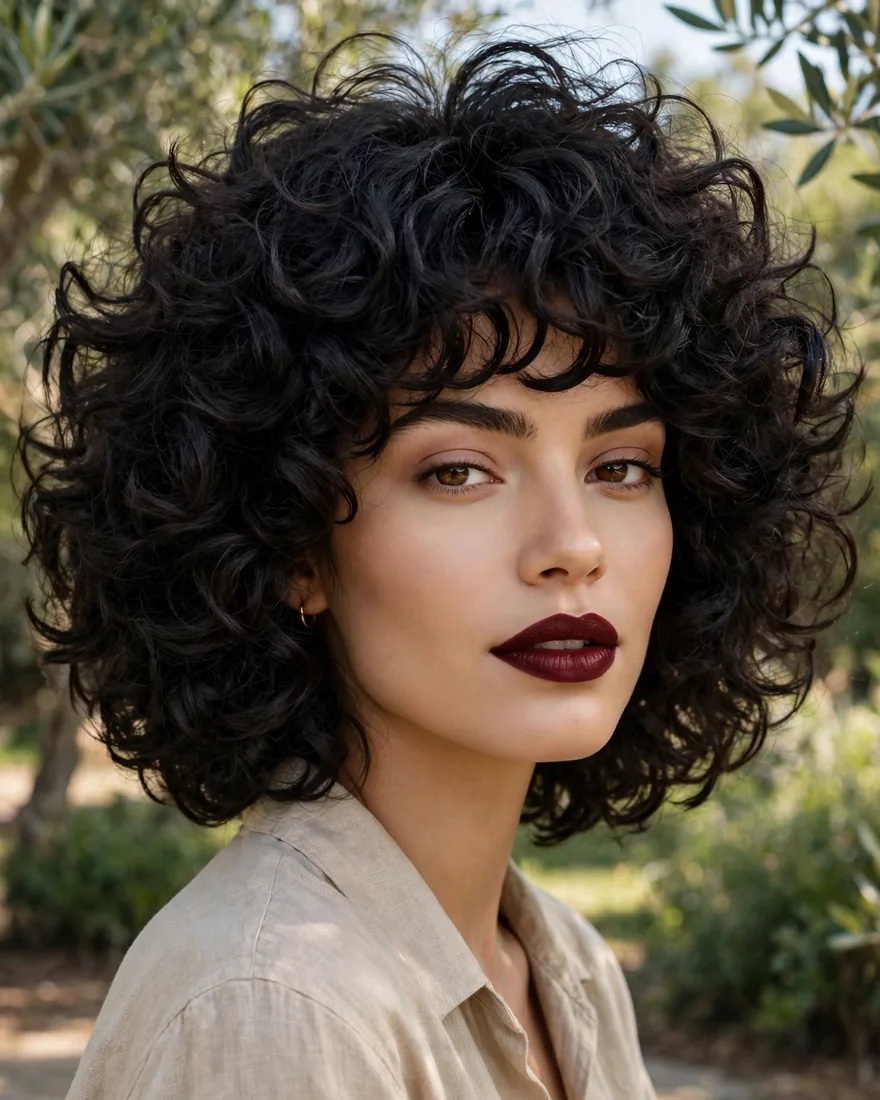
Thick curly hair carries so much internal weight that the shag has to go bolder — deep internal layers carved from underneath remove bulk without changing the outline. The result is a rounded shape that swings instead of sitting like a helmet. For a fuller layered guide, browse these medium shag haircut ideas alongside this pick.
- Benefits:
- Removes real weight so thick curls actually move
- Prevents the heavy bottom-heavy triangle shape
- Wash days dry faster because there is less hair per section
- Pro Tip: Have the stylist check the cut with your head tilted forward — thick curls hide uneven layering until gravity reveals it.
- How To Style: Section into four quadrants and apply leave-in conditioner before a curl-defining gel. Diffuse in large sections; fluff the roots once fully dry for even volume.
- Best For: Thick, dense 3A–3C curls and anyone whose hair takes over three hours to air-dry.
4. Long Curly Shag with Curtain Bangs

Curtain bangs on curls are cut longer than the straight-hair version because every curl springs up as it dries. The bangs frame the forehead and blend into face-framing layers that run down the front. If you are still deciding between fringe styles, this types of bangs overview shows how each one behaves on curls.
- Benefits:
- Softens the hairline and balances a long face
- Bangs blend into layers, so regrowth looks intentional
- Adds face-framing movement without a dramatic chop
- Pro Tip: Cut curly curtain bangs at least an inch longer than the target length — shrinkage is real, and bangs that start at the brow can end at the hairline.
- How To Style: Twist each bang section into two-strand twists while damp, then diffuse forward. Shake the roots out gently once dry to separate.
- Best For: Long 2C–3B curls, oval and oblong faces, and commitment-shy bang wearers.
5. Short Curly Shag with Full Bangs

A full curly fringe paired with a short shag is the boldest look on this list — heavy layers through the crown give the top its shape while the bangs sit right at or just above the brow. It reads retro in the best way and gives short curls a clear focal point. This cut lives or dies by its fringe, so keep it shaped between appointments.
- Benefits:
- Full fringe hides a large forehead and draws attention to the eyes
- Short layers dry fast and style in under ten minutes
- Strong silhouette that photographs beautifully
- Pro Tip: Never straighten curly bangs to “even them out” — the frizz from heat damage makes them grow out unevenly for months.
- How To Style: Apply curl cream to the bangs first (they dry fastest), then work through the rest. Diffuse the fringe forward on low heat, lifting at the roots with your fingers.
- Best For: Confident 3A–3C curl types with 15+ minutes of daily styling time.
6. Side-Parted Curly Shag
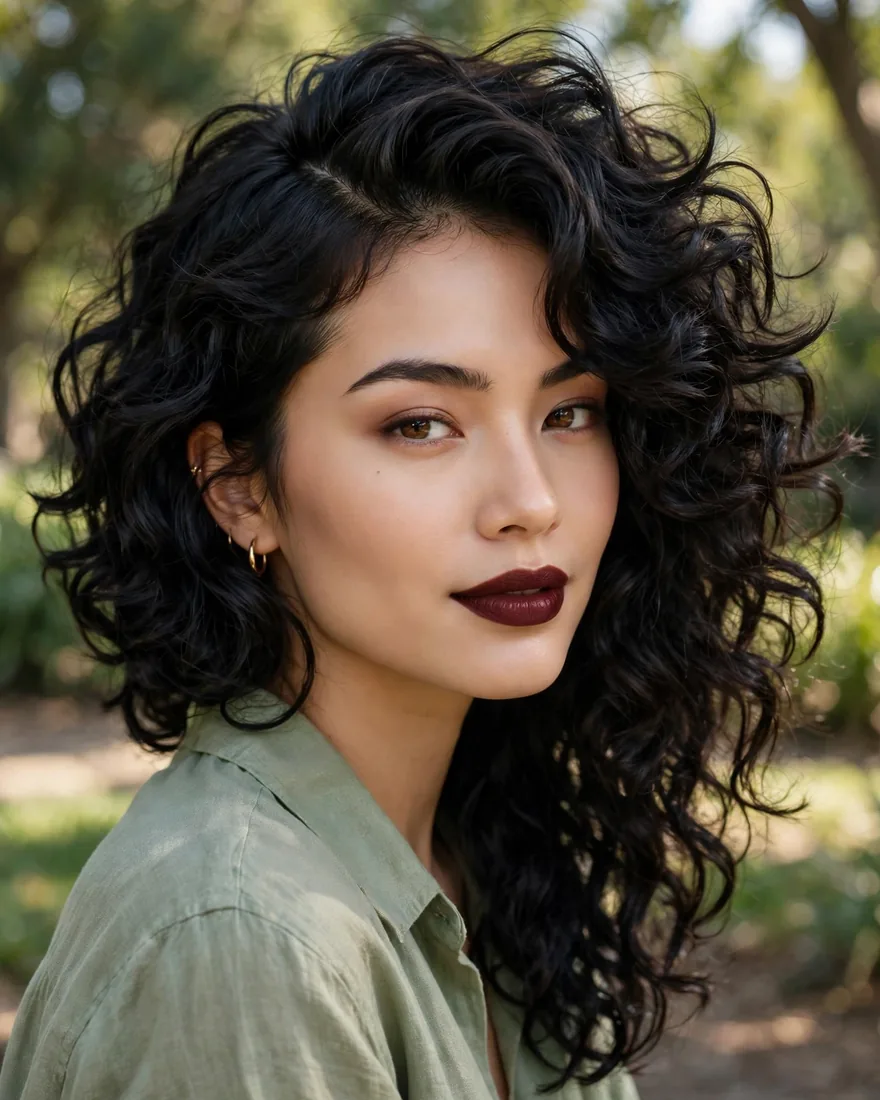
A deep side part instantly redistributes volume — curls pile higher on one side, which gives flat crowns a lift without any product trickery. The shag’s layers fall asymmetrically, so one side reads full and the other sweeps back behind the ear. This is the easiest styling change you can make if your current curly hairstyles feel one-note.
- Benefits:
- Instant crown volume with zero extra product
- Flatters round and square faces by adding asymmetry
- Works on day-two and day-three hair without restyling
- Pro Tip: Flip your part to the opposite side every few days — curls develop memory and the volume collapses if you always part the same way.
- How To Style: Part deeply while hair is soaking wet and clip the roots at the crown with small clips until dry. Remove clips and shake out for lift that lasts.
- Best For: 2C–3B curls with a flat crown, and anyone growing out bangs.
7. Loose-Curl Shag with Long Layers

Looser 2C–3A curls need longer layers — short layering on loose curls unravels into frizz instead of definition. This version keeps the layers long through the back and only adds real texture around the face. It is the calmest version here, ideal if you mostly wear your long hair down.
- Benefits:
- Preserves curl definition that short layers would break up
- Minimal frizz because the cut stays away from the fragile top layer
- Versatile — wears in a ponytail or updo without pieces falling out
- Pro Tip: Ask for “long internal layers, no shorter than chin” — vague “layer it up” requests are how loose curls get chopped too short on top.
- How To Style: Rake curl cream through damp hair, then smooth a light gel over the canopy to seal the cuticle. Air-dry or diffuse; break the cast with a drop of oil.
- Best For: Loose 2C–3A curls, long lengths, and low-frizz priorities.
8. Chin-Length Curly Shag Bob

The shag bob brings all the layering of the classic cut into a compact chin-length frame. Springy curls bounce right up to the jawline, which makes this cut look shorter than it measures — plan for that when choosing length. It is a wash-and-go dream once the shape settles in after the first two weeks.
- Benefits:
- Maximum bounce — short lengths let curls spring to full height
- Fast wash days and very fast diffusing
- Chin-length layers frame the jawline beautifully
- Pro Tip: Cut it half an inch longer than you think you want — chin-length curls spring up to the cheekbone, which is a different look entirely.
- How To Style: Scrunch curl foam through soaking-wet hair and diffuse on high heat, low speed. Fluff roots with fingertips once 100% dry for a rounded shape.
- Best For: Tight 3B–3C curls and anyone ready to commit to a short silhouette.
9. Curly Shag with Micro Bangs
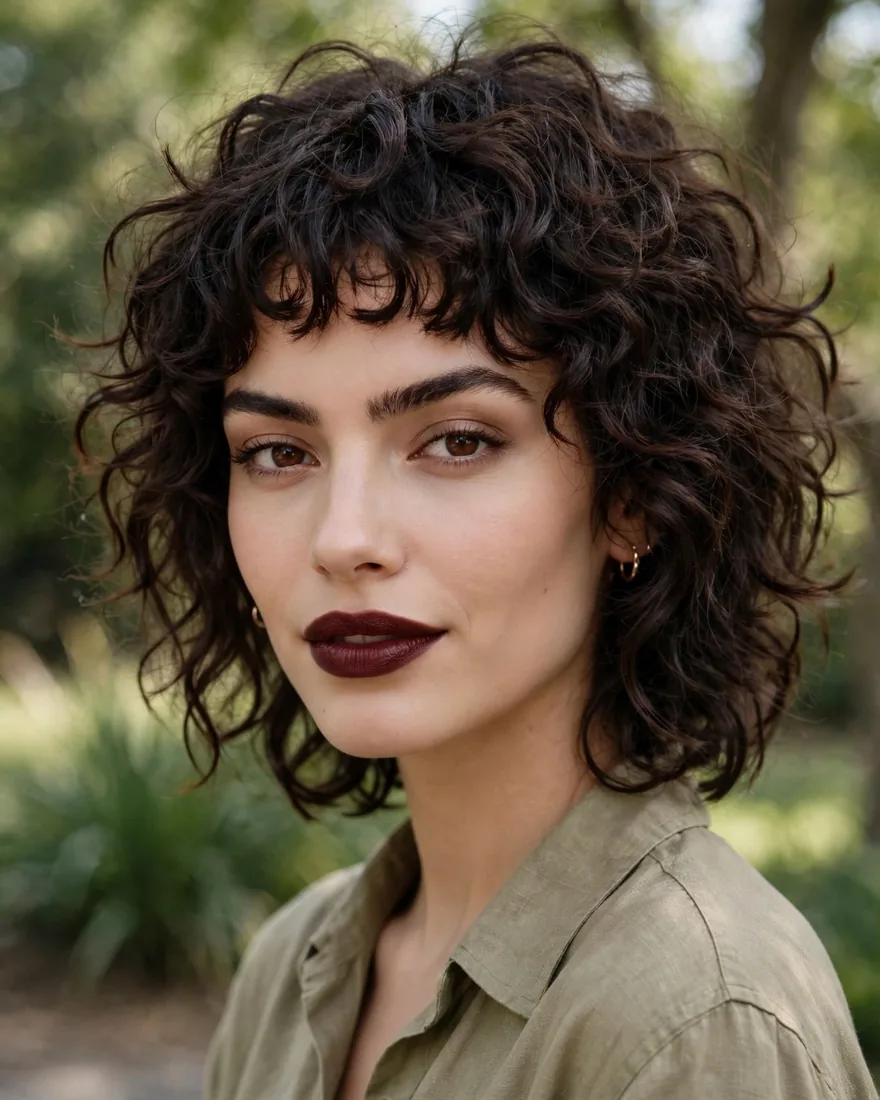
Micro bangs on this cut sit high on the forehead and give the whole cut an editorial edge. They work best on tighter curls that hold their coil — loose curls tend to drop and cover the eyes. Pair this look with the volume of longer layers behind for contrast, similar to how wavy hair layers fall when cut with short top pieces.
- Benefits:
- Bold focal point that makes the cut unmistakably intentional
- Opens up the face and shows off cheekbones
- Grows into curtain bangs gracefully over 6–8 weeks
- Pro Tip: Trim micro bangs yourself between appointments — a tiny trim every 2–3 weeks keeps them above the brow where they belong.
- How To Style: Style the bangs separately with a small amount of curl cream, twisting each coil into definition. Diffuse forward and do not touch until fully dry.
- Best For: 3B–3C coils, oval and heart-shaped faces, and experienced bang wearers.
10. Curly Shag without Bangs
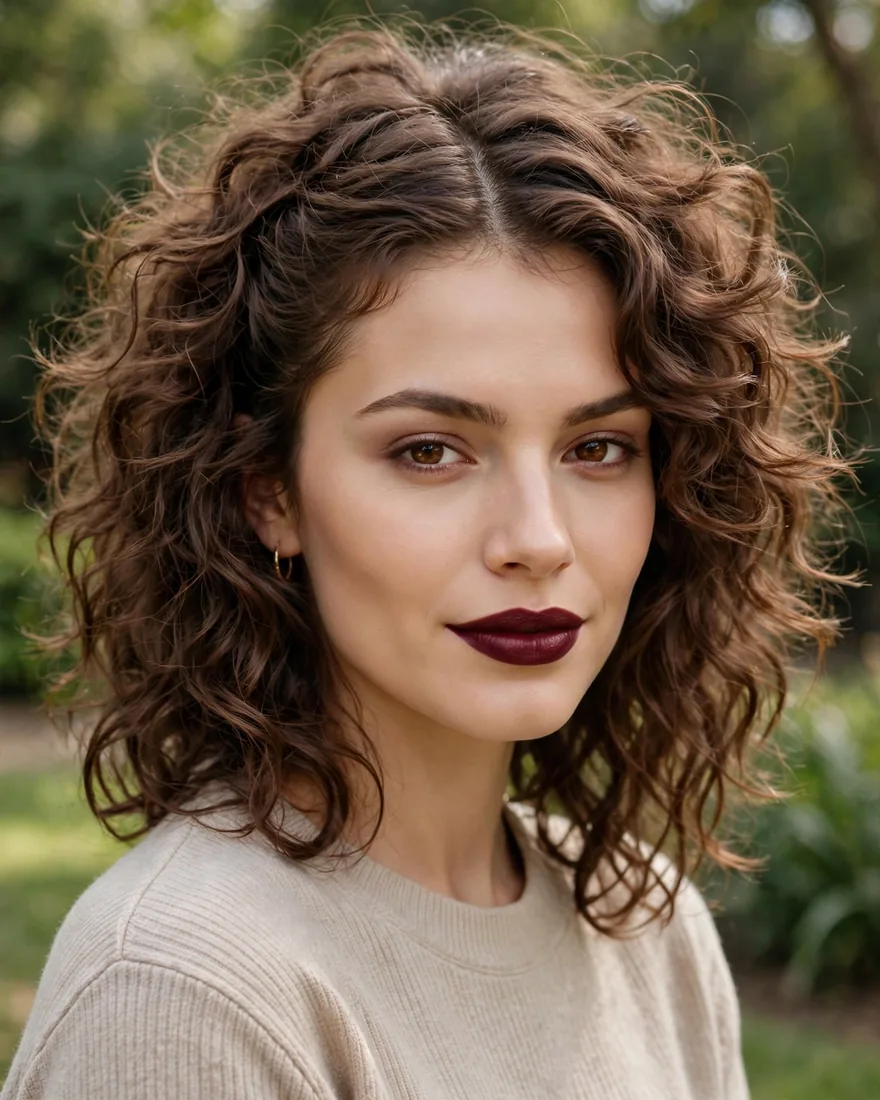
No-bang shags let the layering do all the talking — long front layers open away from the face and blend into the back. This is the safest entry point into the cut, and it grows out the most forgivingly of all 13 looks. Nothing about it requires daily precision.
- Benefits:
- Zero fringe maintenance — no trims needed between appointments
- The most forgiving grow-out of any version here
- Suits every face shape since nothing sits on the forehead
- Pro Tip: Ask for the front layers to start no higher than the cheekbone — higher and they will read as accidental bangs.
- How To Style: Apply products upside down for root lift, then part wherever feels natural once dry. Scrunch the front layers away from the face while damp.
- Best For: First-time shag wearers, 2C–3C curls, and low-maintenance routines.
11. Curly Wolf-Shag

The wolf-shag hybrid pushes the shag’s layering further — much shorter crown layers, longer disconnected ends, and a wilder finish. On curls it reads as volume on top with long, separated tendrils below. It shares DNA with layered cutting, so it helps to understand layered haircut fundamentals before asking for this much texture.
- Benefits:
- Dramatic volume contrast — big crown, long ends
- The most texture-forward option on this list
- Hides uneven curl patterns by making disconnection intentional
- Pro Tip: This cut needs a stylist who actually cuts curly hair regularly — the short crown layers on the wrong head can go full mullet.
- How To Style: Diffuse the crown upside down for maximum lift, then let the longer ends fall naturally. Use a texturizing powder at the roots on day two for grip.
- Best For: 3A–3C curls with medium density, and anyone who wants the boldest version of this style.
12. Wash-and-Go Curly Shag with Bottleneck Fringe
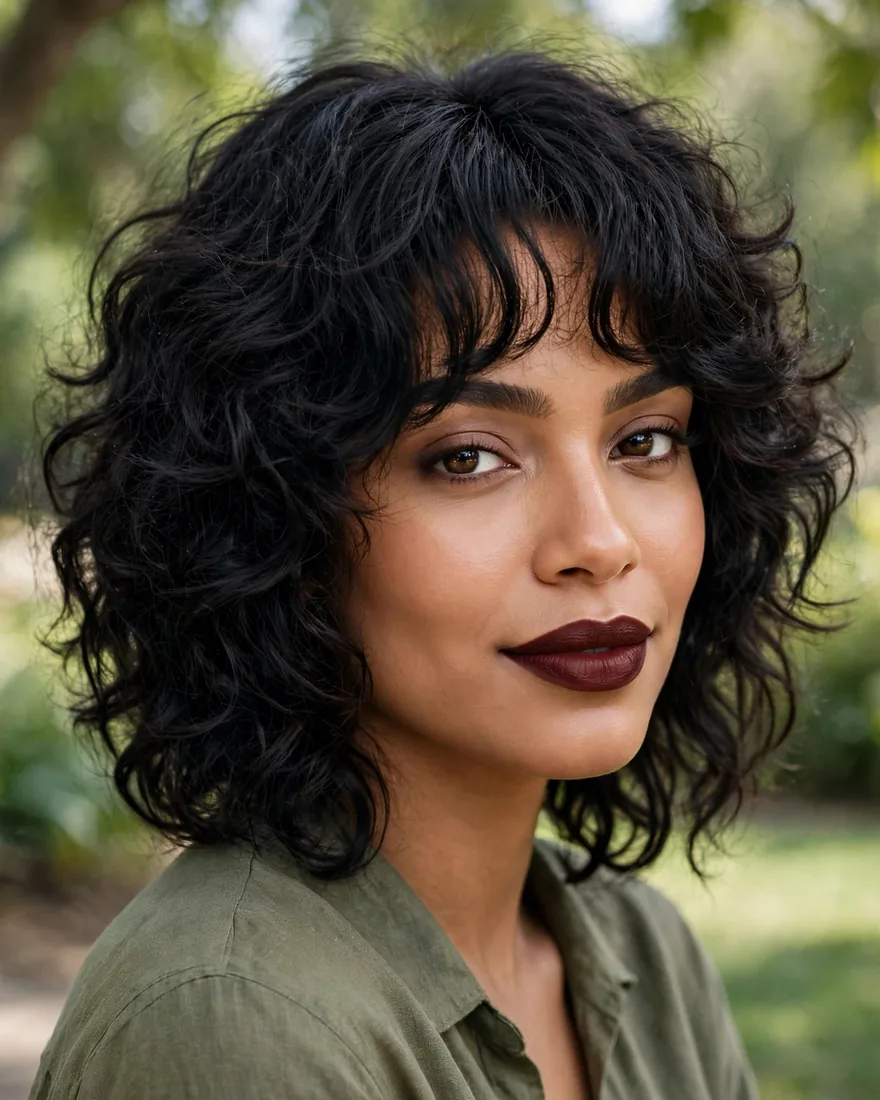
Bottleneck bangs — narrow at the top, widening toward the cheekbones — are the most forgiving curly fringe because their shape survives uneven shrinkage. Combined with a wash-and-go shag, this is the routine-friendly pick: no diffuser marathons, no daily restyling. The fringe frames the face even on days you do almost nothing.
- Benefits:
- Bangs look intentional even when shrinkage is uneven
- True wash-and-go — designed for air-drying
- Fringe camouflages frizz at the hairline
- Pro Tip: Apply styling products to the fringe first, before the rest of the hair — bangs dry fastest and frizz if they start air-drying bare.
- How To Style: Rake leave-in through wet hair, glaze gel over the top, and scrunch. Air-dry completely; separate the fringe pieces with oiled fingers once dry.
- Best For: 2C–3B curls, air-dry devotees, and busy mornings.
13. Copper-Tinted Curly Shag with Layers

Color changes how the cut reads — copper and warm tones make every layer boundary visible, so the cut’s architecture shows even in motion. The tint works on natural warm bases without heavy bleaching, which keeps curls healthy. If you are weighing more color inspiration, the hairstyles for curly hair guide has shade ideas matched to curl types.
- Benefits:
- Warm tones make layering look more defined and dimensional
- Copper fades gracefully into a soft auburn
- Color placement can be concentrated on the top layers for less damage
- Pro Tip: Do the color and the cut in that order — colored curls shrink differently, and cutting first means guessing where the layers will land.
- How To Style: Use color-safe, sulfate-free products to protect the tint. Deep-condition weekly — colored curls lose moisture faster, and dry curls hide the cut’s shape.
- Best For: Warm-undertoned skin, 3A–3C curls, and anyone whose cut looks great but reads “flat” in photos.
How the 13 looks compare at a glance:
| Look | Best Curl Type | Daily Effort |
|---|---|---|
| Tight-Curl Shag with Face-Framing Layers | 3B–3C | Medium |
| Soft Curly Shag for Fine Hair | 2C–3A, fine | Low |
| Rounded Curly Shag for Thick Hair | 3A–3C, thick | Medium |
| Long Curly Shag with Curtain Bangs | 2C–3B | Medium |
| Short Curly Shag with Full Bangs | 3A–3C | High |
| Side-Parted Curly Shag | 2C–3B | Low |
| Loose-Curl Shag with Long Layers | 2C–3A | Low |
| Chin-Length Curly Shag Bob | 3B–3C | Medium |
| Curly Shag with Micro Bangs | 3B–3C | High |
| Curly Shag without Bangs | 2C–3C | Low |
| Curly Wolf-Shag | 3A–3C | Medium |
| Wash-and-Go Curly Shag with Bottleneck Fringe | 2C–3B | Low |
| Copper-Tinted Curly Shag with Layers | 3A–3C | Medium |
How to Choose the Right Curly Shag for Your Curl Type and Density
Start with shrinkage, not style. Stretch a wet curl and let it spring back — if it loses more than half its length, your curl type is tight enough to need the cut planned dry. A shag designed on stretched-out wet hair will come out shorter and rounder than the photo you brought in, which is the number-one reason these cuts disappoint.
Next, check density honestly. Gather your hair into a ponytail: a coin-sized or smaller circumference means fine density, and you want the soft, long-layered version of the cut so the ends stay full. A thick ponytail needs deep internal layers to remove real weight — otherwise the shag’s shape collapses under its own bulk within a week.
Mixed curl patterns are more common than people admit — tighter coils at the nape, looser curls at the front. Tell your stylist this upfront, because one head of hair may need two different layering strategies. The tighter back sections often need more weight removed so they do not push the looser front pieces outward. A good curly cut treats each zone according to its pattern instead of cutting everything the same length.
Finally, match the pick to your real routine. If you air-dry and wash twice a week, choose a wash-and-go friendly option like the bottleneck-fringe shag or the no-bangs version. If you diffuse daily and enjoy styling, the full-bang or micro-bang versions reward the effort. The best cut is the one you will actually maintain.
What to Ask Your Stylist: Dry or Wet Cut, Shrinkage, and How the Shag Grows Out
Walk in with specific questions and the consultation changes completely. Ask first: “Do you cut curls dry or wet?” A dry cut lets the stylist see exactly where each layer lands at its true length, which matters enormously for a shag where the top layers can spring up several inches. If the stylist only cuts wet, ask how much extra length they leave for shrinkage — and be wary of a shrug.
Second, ask about the shortest layer: “How short will the top layers spring up once they dry?” This single question prevents the most common shag regret — a crown that ends up far shorter and rounder than expected. A skilled curl stylist will pull a test section, show you the dry position, and adjust before committing.
Third, ask about the grow-out plan and trim schedule. The cut keeps its shape for roughly 8–12 weeks, but the layers start losing definition around week six as the bottom grows heavier. Most people need a shape-up trim every 10–12 weeks — sooner for fringe versions, which need bang trims every 3–4 weeks to stay intentional. As it grows, the shag melts into long layers rather than an awkward phase, which is one of its honest advantages: there is no terrible in-between, just a gradual softening of the texture.
One more thing to say out loud: “I want weight removed but I want to keep my density.” This tells the stylist you are after internal layering, not thinning shears through the ends. Thinning shears on curls create frizz that shows up weeks later, while internal layers keep the cuticle clean.
Curly Shag Wash-Day and Refresh-Day Routine
The shag’s layers only look good when each curl clumps properly, so the routine matters as much as the cut. Start wash day with a sulfate-free shampoo focused on the scalp — scrub with fingertips, let the suds rinse through the lengths. Follow with a rich conditioner, detangle with a wide-tooth comb while the conditioner sits, and rinse with cool water to seal the cuticle.
Style on soaking-wet hair, never towel-dried. Work in four sections: smooth leave-in conditioner through each, then glaze a curl-defining gel or cream over the surface without raking it through (raking breaks the clumps the shag depends on). Scrunch upward to encourage the layers to stack. Diffuse on medium heat, low speed, cupping sections from the ends toward the scalp — or air-dry if your schedule allows. Do not touch the hair until it is 100% dry; breaking the gel cast early is the main cause of shag-day frizz.
On refresh days, do not re-wet the whole head. Mist the flattened sections lightly, smooth a pea-sized amount of curl cream over the canopy, and scrunch. For humidity days, a light anti-humidity serum on the outer layer keeps the shag’s silhouette intact without weighing it down. Pineapple the hair at night — a loose high ponytail on a silk scrunchie — and sleep on a satin pillowcase so the crown layers survive until morning.
For 4C coily hair, the routine shifts slightly: the shag works beautifully, but coils need heavier sealing. Layer a leave-in, then a cream, then an oil or butter on damp hair before twisting or shingling each section. The cut’s shape shows best on stretched or defined coils, so a twist-out or braid-out on wash day gives the layers their clearest definition.
FAQs
Will this cut work on fine hair?
Yes, but it needs a softer version of the cut. Fine curls do best with long, subtle layers that remove weight only through the mid-lengths, keeping the ends full. Ask for scissor-cut layers rather than razor texturizing, which can make fine ends look wispy within weeks.
How do I avoid the triangle shape with this cut?
The triangle shape comes from weight sitting at the bottom with nothing to lift the top. A proper shag fixes this with short crown layers and internal layering that removes bulk from underneath. Drying the roots with lift — diffusing upside down or clipping the crown — also keeps volume high instead of wide.
Should I get a dry cut or a wet cut for a shag?
A dry cut is the safer choice for a shag because the stylist can see exactly where each layer lands at its true, shrunken length. Wet cuts work only if the stylist leaves generous extra length for shrinkage. If your salon only cuts wet, ask how they account for your specific curl pattern’s shrinkage before the scissors come out.
How often do I need a trim to keep the shag shape?
Plan on a shape-up trim every 10–12 weeks to keep the layers defined. Fringe versions need more attention — bang trims every 3–4 weeks keep the fringe intentional. Between appointments, the cut grows out gracefully into long layers rather than an awkward phase.
Can I get a shag without bangs?
Absolutely — the no-bangs version is one of the most popular picks because it needs zero fringe maintenance and grows out the most forgivingly. Long front layers open away from the face and blend into the back, giving you the shag’s movement without anything sitting on the forehead.
How does a shag grow out?
Better than most layered cuts. As the layers grow, the shag softens into long, textured layers rather than hitting an awkward in-between stage. The main change you will notice is the bottom getting heavier around month three, which is your signal to book the shape-up trim. Fringe pieces grow into face-framing layers on their own.
What products work best for styling a shag?
A three-product routine covers most curl types: a leave-in conditioner for moisture, a curl-defining cream or gel for hold, and a light oil to break the gel cast once dry. Fine curls should stick to foams and light creams, while thick and coily hair needs richer creams and butters to keep the layers defined.
Will a shag work on 4C coily hair?
Yes — the shag’s layering removes the bulk that makes 4C hair sit heavy, and the shape shows beautifully on defined coils. The key is cutting with the hair in its styled state (twist-out or stretched) so the layers land where you expect. Use the LOC method — leave-in, oil, cream — to keep coils moisturized and the cut’s shape crisp.
The right cut is not the prettiest photo in the gallery — it is the cut matched to your curl pattern, your density, and the mornings you actually have. Pick the version that fits your texture and routine, walk into the salon with the right questions, and give the layers two weeks to settle before you judge the result. Curls reward patience, and this cut rewards it more than most.